開始使用Visual C++
- 在Visual Studio .NET中,選擇[Create a new project]。
- 選擇 [C++]-[Windows]-[CLR Empty Project ( .NET Framework)]。

- 選擇功能表-[Project]-[Add Reference]。
- 在[瀏覽]標籤上,選擇「\API」目錄下的「RCAPINt2.dll」檔。
- .NET Framework : \Assembly\net462
- .NET6/ .NET8 : \Assembly\net6.0-windows
- 選擇功能表-[Project]-[Add New Item]-[UI]-[Windows Form]。
- 打開添加的表單的cpp檔案(例: Form1.cpp),然後添加以下原始碼。
#include "Form1.h"

 using namespace SampleProject;  // 建立的專案名稱
 void main() {
    Application  EnableVisualStyles();
    Application  SetCompatibleTextRenderingDefault(false);

    Form1 frm;  // 新增的表單名稱
    Application Run(% frm);
 }
選擇功能表- [Project]-[Project Properties]。
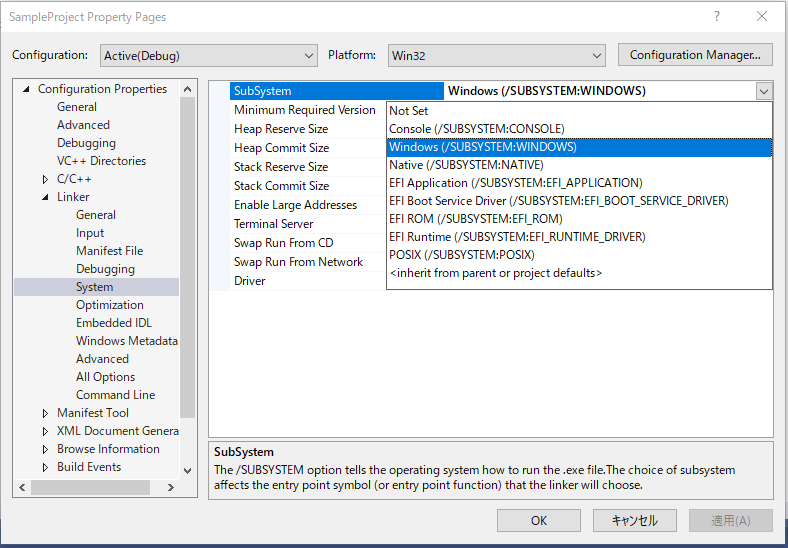
在屬性頁選擇 [Configuration Properties]-[Linker]-[System],然後從子系統中選擇「Windows (/SUBSYSTEM:WINDOWS)」。
在屬性頁選擇[Configuration Properties]-[Linker]-[Advanced],然後在「Entry Point」中輸入步驟(6)添加的函數名稱。在此範例中,鍵入 “main”。
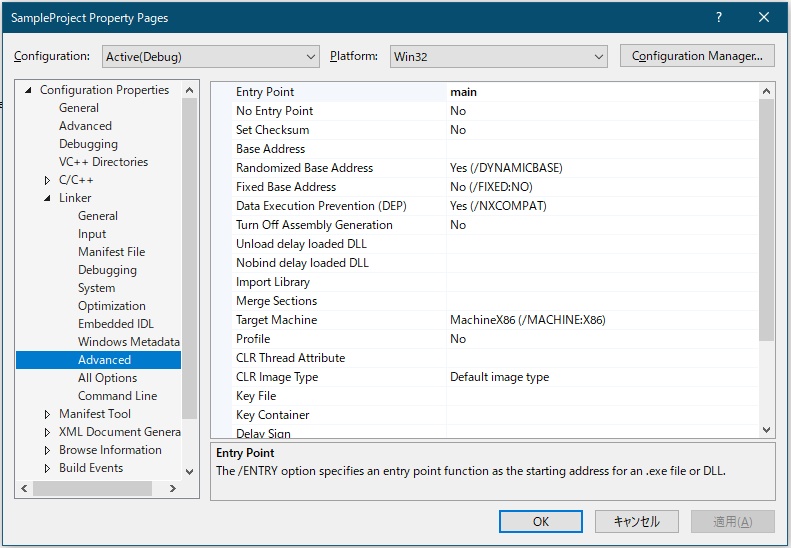
按一下[OK]按鈕。
提示
設定完成後,建置解決方案,并確認沒有發生錯誤。然後我們建議您關閉解決方案,并重新打開它。
- 在Form1類別中宣告Spel變數,如下所示。
private:RCAPINet::Spel^ m_spel;
- 在Form_Load事件中添加初始化程式碼,如下所示。
private:System::Void Form1_Load(
   System::Object^ sender, System::EventArgs^ e)
{
   m_spel = gcnew RCAPINet::Spel();
   m_spel->Initialize();
   m_spel->Project =
      "c:\\EpsonRC80\\projects\\ API_Demos\\Demo1\\demo1.sprj";
   m_spel->EventReceived += gcnew
      RCAPINet::Spel::EventReceivedEventHandler(
      this, &Form1::m_spel_EventReceived);
}
- 添加事件處理常式,如下所示。
private:System::Void m_spel_EventReceived(
   System::Object^ sender, RCAPINet::SpelEventArgs^ e)
{
   MessageBox::Show(e->Message);
}
提示
當應用程式結束時,若Spel類別執行個體是在堆積上分配(使用gcnew),則您必須刪除每個Spel類別執行個體。您可在主要表單的FormClosed事件中完成此操作。若沒有刪除Spel類別執行個體,應用程式將無法正確關閉。
delete m_spel;
← 開始使用Visual C# 環境 →