Let’s Create The Extension
Extension (RC+ Custom) provides a mechanism (extension points) for incorporating unique features into Epson RC+, such as adding menu items, managing project files, and displaying docking windows.
These work by implementing the interfaces for extension points provided by the Extensions API as exports of the Managed Extensibility Framework (MEF), which is .NET's built-in extension framework.
When creating an Extension project, you can select the extension point you want to use as the Initial Feature, or you can add it as a new item even after the project is created.
This section describes how to implement the extension points.
This section provides an example of how to implement extension points, describing the process from creating an RC+ Extensions project to using it with Epson RC+.
The following procedure describes the process in creating a sample application that places a button in the Extension's docking window and uses the Extension API interface to connect/disconnect a controller.
Follow the procedure in [Getting Started] to create an Extensions project.
- Name it "ConnectControllerSample."
- Select the Main menu and tool bar item and Docking window initial features.
- For ARM64 versions of Windows, set the configuration to x64.
Build and debug the project in Visual Studio to make sure it works.
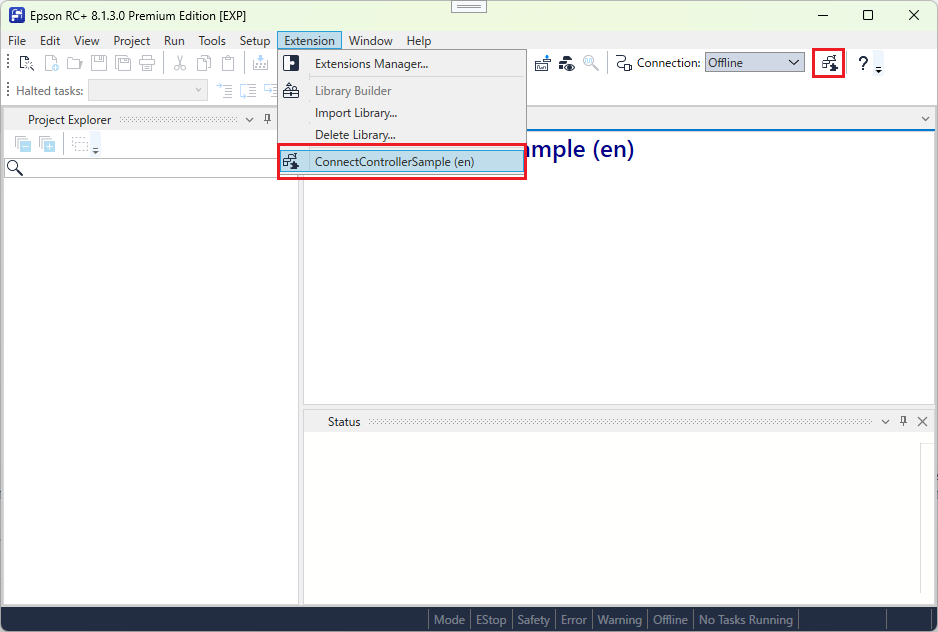
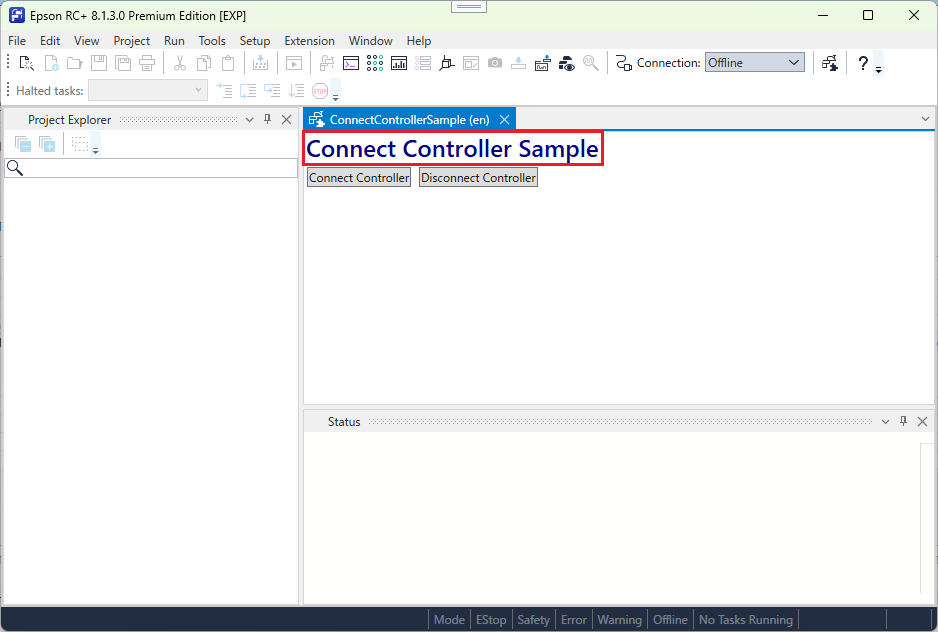
- The menu item
ConnectControllerSample (xx)(where xx is the display language) is added to the Extension tab on the Epson RC+ main menu. The project is OK if the docking window appears when you select this menu item
- The menu item
Since the template has been verified, exit Epson RC+ for now.
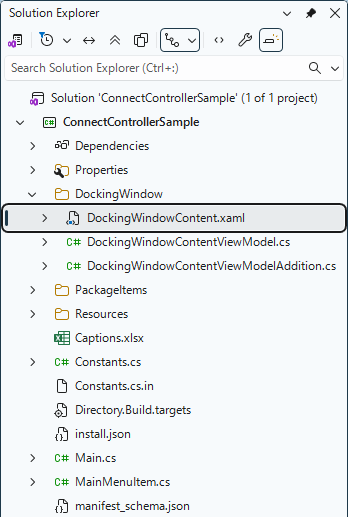
Edit the DockingWindowContent.xaml file in the DockingWindow folder using Visual Studio.
- Add a controller connection button and a controller disconnection button within the Grid below the automatically generated TextBlock.
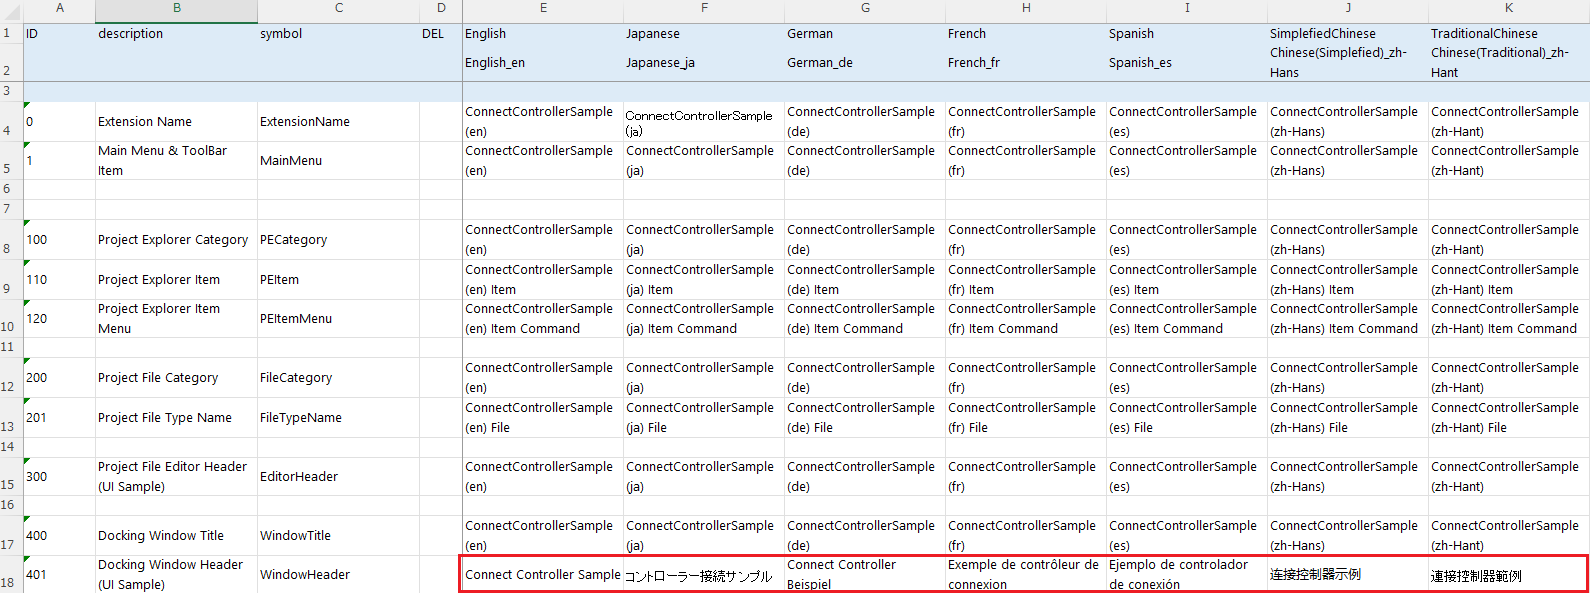
- Note the Text of TextBlock. It is bound to the Captions[WindowHeader].Value. In this Extension, define the strings to be localized according to the Epson RC+ display language in Captions.xlsx. Although details are described later, you can localize according to the Epson RC+ display language by binding in the same way using the name defined in the symbol column of Captions.xlsx (in this example, WindowHeader).
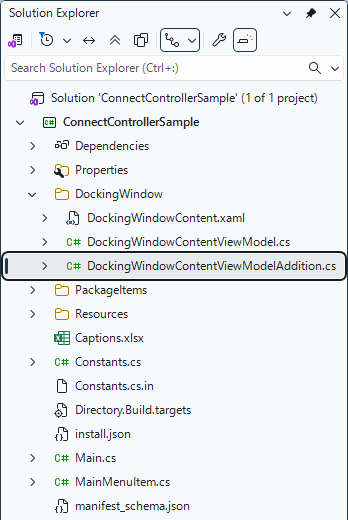
<UserControl x:Class="ConnectControllerSample.DockingWindow.DockingWindowContent"
             xmlns="http://schemas.microsoft.com/winfx/2006/xaml/presentation"
             xmlns:x="http://schemas.microsoft.com/winfx/2006/xaml"
             xmlns:mc="http://schemas.openxmlformats.org/markup-compatibility/2006"
             xmlns:d="http://schemas.microsoft.com/expression/blend/2008"
             xmlns:local="clr-namespace:ConnectControllerSample.DockingWindow"
             mc:Ignorable="d"
             d:DesignHeight="450" d:DesignWidth="800">

    <UserControl.DataContext>
        <local:DockingWindowContentViewModel />
    </UserControl.DataContext>

    <DockPanel
        Background="White"
        LastChildFill="True">

        <TextBlock
            Margin="3,0,0,0"
            DockPanel.Dock="Top"
            FontSize="24"
            FontWeight="Bold"
            Foreground="DarkBlue"
            Text="{Binding Captions[WindowHeader].Value}" />

        <Grid>
            <Grid.RowDefinitions>
                <RowDefinition Height="Auto" />
                <RowDefinition Height="Auto" />
            </Grid.RowDefinitions>

            <Grid.ColumnDefinitions>
                <ColumnDefinition Width="Auto" />
                <ColumnDefinition Width="*" />
            </Grid.ColumnDefinitions>

            <Button
                x:Name="ConnectButton"
                Grid.Row="0"
                Grid.Column="0"
                Margin="4"
                HorizontalAlignment="Left"
                VerticalAlignment="Top"
                Command="{Binding ConnectCommand}"
                Content="Connect Controller" />

            <Button
                x:Name="DisconnectButton"
                Grid.Row="0"
                Grid.Column="1"
                Margin="4"
                HorizontalAlignment="Left"
                VerticalAlignment="Top"
                Command="{Binding DisconnectCommand}"
                Content="Disconnect Controller" />
        </Grid>

    </DockPanel>

</UserControl>
Edit DockingWindowContentViewModelAddition.cs in the DockingWindow folder.
- Add the ConnectCommand and DisconnectCommand that was bound to the controller connection and disconnection Button in .xaml.
- To check the connection status of the robot controller, refer to the IsOnline property of the IRCXControllerConnectionAPI (controller connection API) . IsOnline is true if the connection is established, false if the connection is cut, or null otherwise (in an intermediate state such as attempting to establish a connection).
- Call the ConnectControllerAsync method of the IRCXControllerConnectionAPI to connect with the robot controller. Call the DisconnectControllerAsync method of the API to disconnect from the robot controller.
- Call the ShowMessageBox method in the IRCXWindowAPI (Window API) to display the message box.
- In the constructor, obtain the IRCXControllerConnectionAPI and IRCXWindowAPI instances from the MEF container via the GetAPI method of Main class.
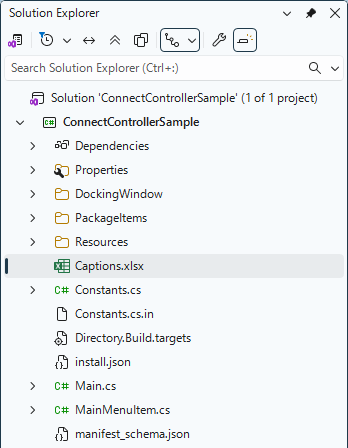
(前略)
namespace ConnectControllerSample.DockingWindow
{
    /// <summary>
    /// Extension : Docking Window (Specific Part)
    /// </summary>
    internal partial class DockingWindowContentViewModel
    {
        /// <summary>
        /// Connect controller command
        /// </summary>
        public AsyncReactiveCommand ConnectCommand { get; } = new AsyncReactiveCommand();

        /// <summary>
        /// Disconnect controller command
        /// </summary>
        public AsyncReactiveCommand DisconnectCommand { get; } = new AsyncReactiveCommand();

        /// <summary>
        /// Window-related API
        /// </summary>
        private IRCXWindowAPI _windowAPI;

        /// <summary>
        /// Controller Connection API
        /// </summary>
        private IRCXControllerConnectionAPI _connectionAPI;

        /// <summary>
        /// Constructor
        /// </summary>
        public DockingWindowContentViewModel()
        {
            _windowAPI = Main.GetAPI<IRCXWindowAPI>();
            _connectionAPI = Main.GetAPI<IRCXControllerConnectionAPI>();

            ConnectCommand.Subscribe(OnConnect);
            DisconnectCommand.Subscribe(OnDiscconect);
        }

        private async Task OnConnect()
        {
            if (_connectionAPI.IsOnline == false)
            {
                var result = await _connectionAPI.ConnectControllerAsync();

                _windowAPI.ShowMessageBox(
                    new RCXCaption(Main.CommonId, Caption.ExtensionName),
                    new RCXCaption(result ? "Controller connection succeed." : "Controller connection failed."),
                    IRCXWindowAPI.ButtonType.OK,
                    IRCXWindowAPI.IconType.Information);
            }
            else
            {
                _windowAPI.ShowMessageBox(
                    new RCXCaption(Main.CommonId, Caption.ExtensionName),
                    new RCXCaption("The controller cannot be connected."),
                    IRCXWindowAPI.ButtonType.OK,
                    IRCXWindowAPI.IconType.Warning);
            }
        }

        private async Task OnDiscconect()
        {
            if (_connectionAPI.IsOnline == true)
            {
                await _connectionAPI.DisconnectControllerAsync();
            }
            else
            {
                _windowAPI.ShowMessageBox(
                    new RCXCaption(Main.CommonId, Caption.ExtensionName),
                    new RCXCaption("The controller cannot be disconnected."),
                    IRCXWindowAPI.ButtonType.OK,
                    IRCXWindowAPI.IconType.Warning);
            }
        }

        /// <inheritdoc />
        public Task WindowCreated()
        {
            return Task.CompletedTask;
        }
    }
}
Edit the Captions.xlsx file under the project folder.
- The symbol column changes the caption for each language in the WindowHeader line.
Build and debug the project.
- In the Epson RC+, click the menu or the tool bar icon in the developed Extension to display the DockingWindow you created.
- Confirm that the captions set in the Captions.xlsx that supports the current Epson RC+ language is displayed in the upper part of the screen.
- Confirm that the Controller can be connected with the [Connect Controller] button and disconnected with the [Disconnect Controller] button.
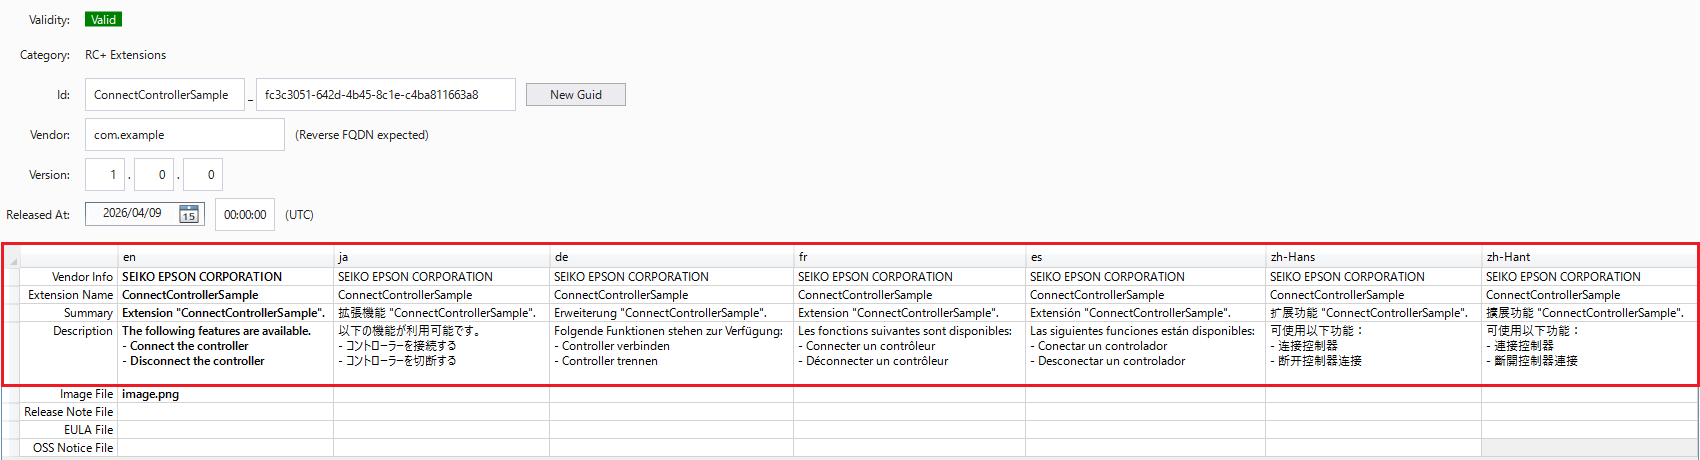
Edit the manifest.rcxmanifest in the PackageItems folder using Visual Studio.

- Change the strings of each language in the Vendor Info, Extension Name, Summary, Description line.
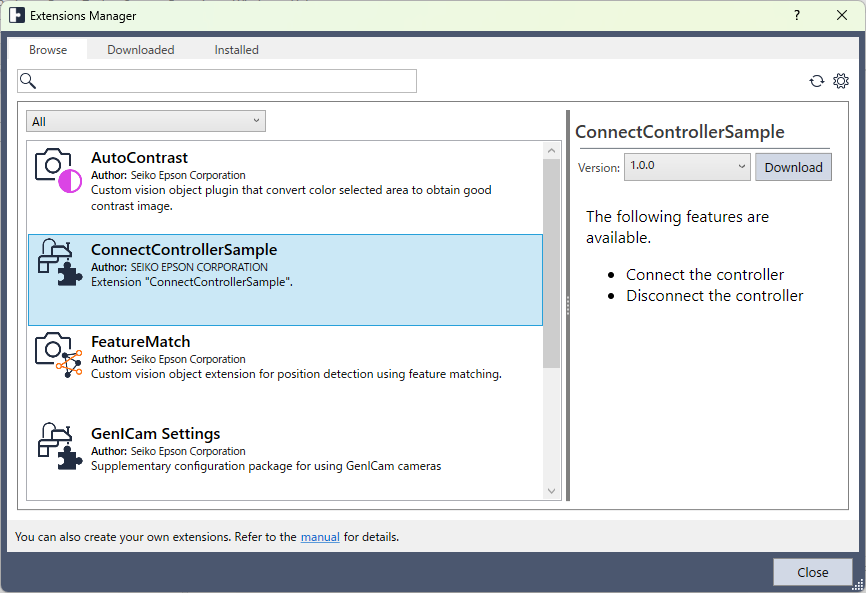
Follow the procedure in [Distributing Extensions] to display the Extension developed in the Extensions Manager.
- Confirm that the information set in manifest.rcxmanifest, which supports the current Epson RC+ language, is displayed on the screen.
- Confirm that the information set in manifest.rcxmanifest, which supports the current Epson RC+ language, is displayed on the screen.
Follow the procedure in [Using Extensions] to confirm that the function developed by enabling Extension can be used.