Selecting a Feeder to Connect
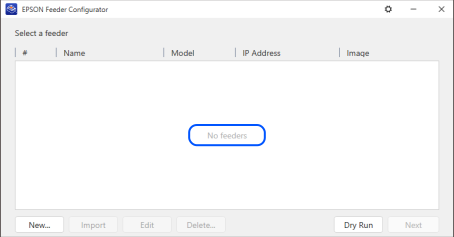
When you launch the Epson Feeder Configurator, a screen will appear where you can select the feeder to connect. If this is the first time you launch it, or if you haven't registered a feeder before, there will be no feeders to select, and "[No Feeders]" will be displayed.
If the registration information is available, a screen will appear allowing you to select a registered feeder.
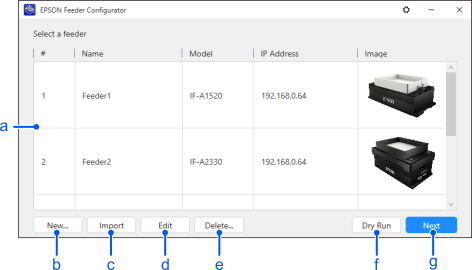
| Item | Description | |
|---|---|---|
| a | List of registered feeders | Shows a list of the feeders registered in the Epson Feeder Configurator. |
| b | New... | Displays the [Add Feeder] dialog box to register a new feeder. |
| c | Import | You can reuse parameters used in other models. Select the file exported from the model you used and import the parameters. |
| d | Edit | Change the name and network settings of a previously registered feeder. |
| e | Delete | Deletes the selected feeder. |
| f | Dry run | Opens the main window in dry run mode. See below for more details. |
| g | Next | Displays the main window for the selected feeder. |
KEY POINTS
You cannot select more than one feeder at a time.
Click [New...] to register a new feeder. Enter the required information on the feeder addition screen and click [Save]. The feeder information is registered in the Epson Feeder Configurator.
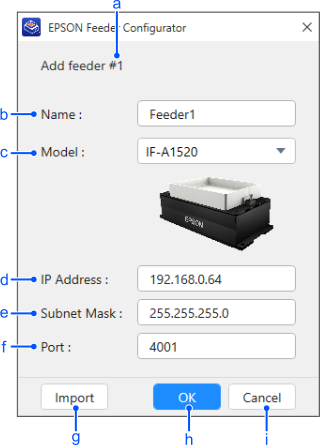
| Item | Description | |
|---|---|---|
| a | Feeder number | The feeder number to be registered. The numbers from 1 to 8 are allocated automatically. |
| b | Name | You can specify any name you want for a feeder.
|
| c | Model | Select the feeder model. |
| d | IP Address | Specify the feeder IP address. Default: 192.168.0.64 |
| e | Subnet Mask | Specify the feeder subnet mask. Default: 255.255.255.0 |
| f | Port | Specify the feeder TCP port number. Default: 4001 |
| g | Import | You can reuse parameters used in other models. Select the file exported from the model you used and import the parameters. |
| h | OK | Register the feeder using the entered details. |
| i | Cancel | Discard the entered information and return to the feeder model selection screen. |
KEY POINTS
- You can register up to 8 feeders.
- If the registration information is incorrect, you will not be able to connect to the feeder.
The registered feeder information can be edited. You can change the name, model, and network settings.
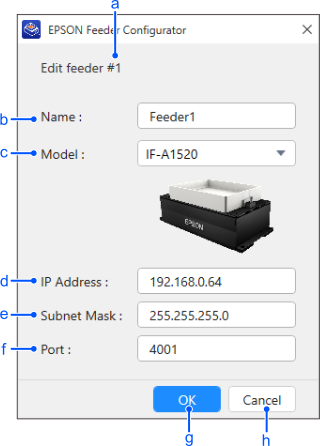
| Item | Description | |
|---|---|---|
| a | Feeder number | The feeder number whose contents you want to change. |
| b | Name | You can specify any name you want for a feeder.
|
| c | Model | Select the feeder model. |
| d | IP Address | Specify the feeder IP address. Default: 192.168.0.64 |
| e | Subnet Mask | Specify the feeder subnet mask. Default: 255.255.255.0 |
| f | Port | Specify the feeder TCP port number. Default: 4001 |
| g | OK | Register the feeder using the entered details. |
| h | Cancel | Discard the entered information and return to the feeder model selection screen. |
Once the selected feeder is correctly connected, the main screen will appear. In this screen, you can configure the feeder's operation.
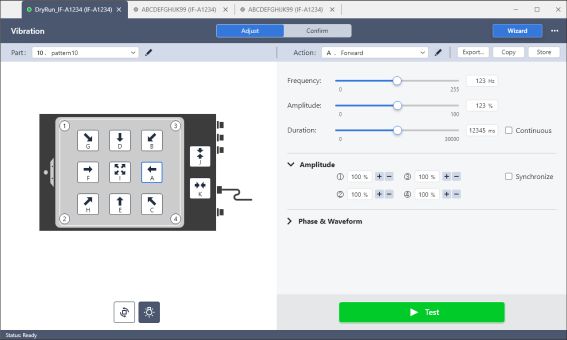
Select the link below for details about the main window.
Main Window