簡易ジョグ
RC+ には、ロボットマネージャーなどから呼び出せるフル機能の「ジョグ&ティーチ」が装備されていますが、Extension を作成すると、この「ジョグ&ティーチ」の必要な機能だけを呼び出す、カスタムジョグパネル(ウィンドウ)を実現することができます。
利用シーンによって、カスタムジョグパネルを作成することで、ティーチの効率化が行える可能性があります。
また、カスタムジョグパネルに限らず、RC+ Extensions を通じて RC+ をカスタマイズすることで、自分だけの RC+ を作って、より快適に作業できるようになることが期待されます。
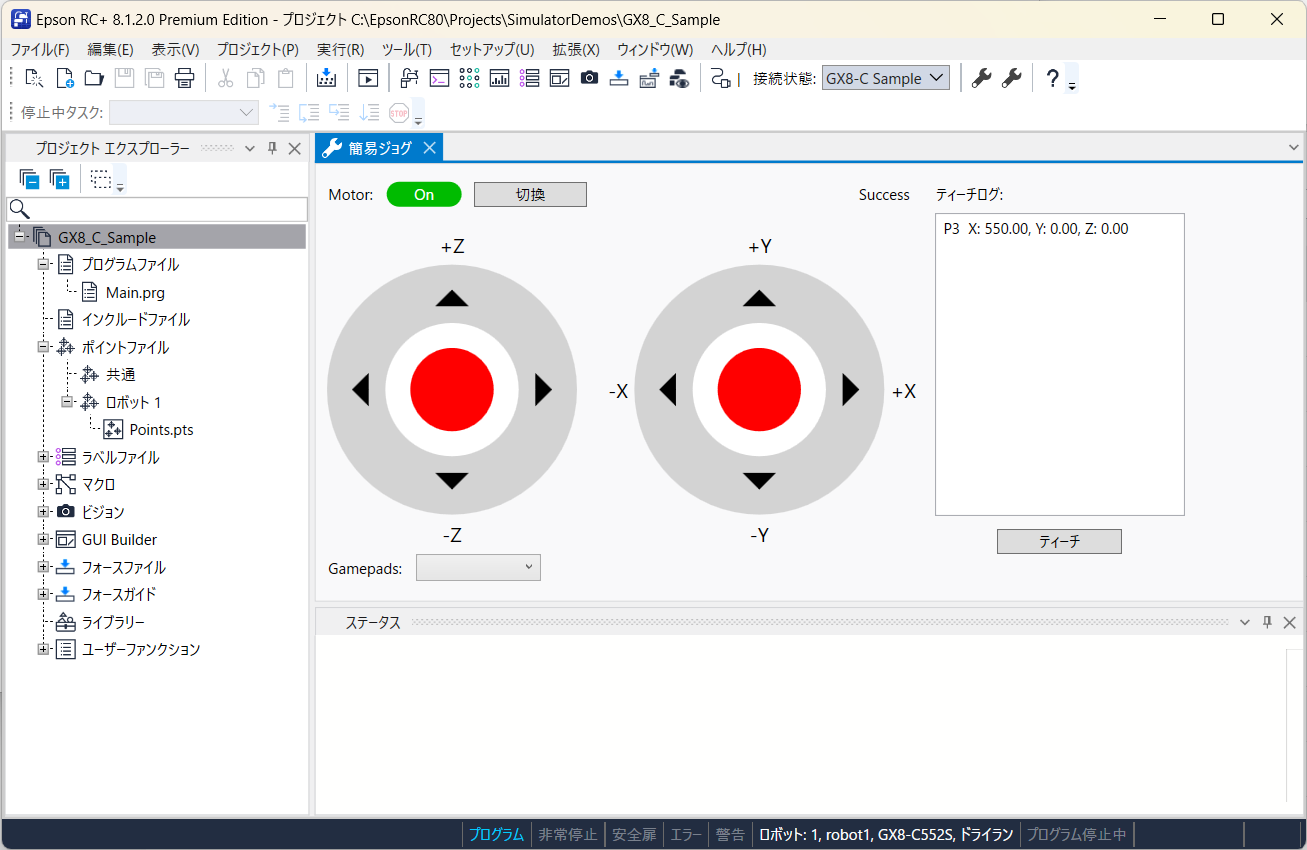
このチュートリアルの初級編では、以下の簡単なジョグパネルを作成して、機能の呼び出し方を説明します。
- モーターの「切換」ボタンをクリックすると、モーターのオン/オフを切り換えます。
- パネルは、マウスのドラッグで動かす、ゲームパッドの「スティック」風なコントロールを左右に一つずつ持ちます。
- 左のスティックでは、上下で Z 座標に沿ったジョグを行います。
- 右のスティックでは、上下で Y 座標、左右で X 座標に沿ったジョグを行います。
- 「ティーチ」ボタンをクリックすると、ロボットの現在の位置姿勢を、対象としたポイントファイルで、まだ未定義なポイントを選んで順次ティーチします。
- ポイントには、この Extension でティーチしたことと、ティーチした日時を示すコメントを入れます。
- パネルには、ティーチしたポイントを示すログを表示します。
中級編では、実際にゲームパッドが接続されている場合に、そのゲームパッドで操作が行えるようにします。
- モーターの「切換」は、左のバンバーボタン(Shoulder ともいいます)に割り当てます。
- 左右の「スティック」風なコントロールは、実際のスティックで操作できるようにします。
- 「ティーチ」は A ボタンに割り当てます。
注意
ロボットの実機でこの Extension を試す場合は、安全に配慮した設計の上、必ず安全柵の外側で操作するようにしてください。
それでは始めましょう。
■ 初級編
[利用開始]の手順に従って、RC+ Extensions の新しいプロジェクトを作成します。
- 名前は、SimpleJog とします。
- 初期機能は、Main menu and tool bar item および Docking window をチェックします。
- ARM64 版 Windows では、構成を x64 に変更してください。
Visual Studio上でビルド、デバッグして、動作することを確認します。
- RC+メインメニュー上の拡張タブのメニュー項目に
SimpleJog (xx)(xx は表示言語名)が追加され、メニュー項目を選択して、ドッキングウィンドウが表示されれば OK です。
- RC+メインメニュー上の拡張タブのメニュー項目に
テンプレートの確認は完了したので、一旦 RC+ を終了します。
DockingWindow フォルダーに、以下のファイルを追加します。
Stick.xaml
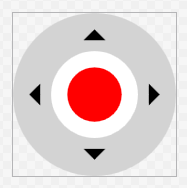
- 「スティック」風な見た目を実現したユーザーコントロールのファイルです。
- コントロールが有効されている場合は、中央の「ノブ」が赤色になり、マウスのドラッグで動かすことができます。
<UserControl x:Class="SimpleJog.DockingWindow.Stick" xmlns="http://schemas.microsoft.com/winfx/2006/xaml/presentation" xmlns:x="http://schemas.microsoft.com/winfx/2006/xaml" xmlns:mc="http://schemas.openxmlformats.org/markup-compatibility/2006" xmlns:d="http://schemas.microsoft.com/expression/blend/2008" xmlns:i="http://schemas.microsoft.com/xaml/behaviors" xmlns:local="clr-namespace:SimpleJog.DockingWindow" mc:Ignorable="d" d:DesignHeight="300" d:DesignWidth="300"> <Canvas Width="300" Height="300"> (中略) </Canvas> </UserControl>- 「スティック」風な見た目を実現したユーザーコントロールのファイルです。
Stick.xaml.cs
- Stick コントロールの「ノブ」をマウスで動かすためのコードを追加したコードビハインドのファイルです。
(前略)

namespace SimpleJog.DockingWindow
{
    (中略)

    /// <summary>
    /// Stick.xaml interaction logic
    /// </summary>
    public partial class Stick : UserControl
    {
        (中略)

        /// <summary>
        /// Constructor
        /// </summary>
        public Stick()
        {
            InitializeComponent();

            Knob.Loaded += (_, _) =>
            {
                _radius = Math.Min(KnobRange.RenderSize.Width, KnobRange.Height) / 2.0 * _limitFactor;
                _deadZone = _radius * _deadZoneFactor;
                _center = new Point(KnobRange.RenderSize.Width / 2.0, KnobRange.RenderSize.Height / 2.0);
            };

            Knob.MouseLeftButtonDown += (_, ev) =>
            {
                Knob.CaptureMouse();

                _dragging = true;

                _offset = ev.GetPosition(KnobRange) - _center;
                _smoothed = new Vector();
            };

            (中略)
        }

        /// <summary>
        /// Update knob position
        /// </summary>
        /// <param name="mousePosInRange">Relative mouse position in knob range</param>
        private void UpdateKnobPosition(
            Point mousePosInRange
        )
        {
            var x = mousePosInRange.X - _center.X;
            var y = mousePosInRange.Y - _center.Y;

            var distanceFromCenter = Math.Sqrt(x * x + y * y);
            if (distanceFromCenter < _deadZone)
            {
                Position = _smoothed = new Vector();
            }
            else if (distanceFromCenter < _radius)
            {
                _smoothed = new Vector(
                    _smoothed.X * (1 - _smoothingFactor) + (x / _radius) * _smoothingFactor,
                    _smoothed.Y * (1 - _smoothingFactor) + (y / _radius) * _smoothingFactor
                );
                Position = new Vector(_smoothed.X, -_smoothed.Y);
            }
        }
    }
}
StickProperties.cs
- Stick コントロールに、「ノブ」位置を示す Vector 型の Position プロパティを追加するためのファイルです。
- Vector の各要素(X および Y)は、-1.0 から +1.0 の値を取るように正規化されます。
(前略) namespace SimpleJog.DockingWindow { using System.Windows; /// <summary> /// Stick.xaml dependency properties /// </summary> public partial class Stick { /// <summary> /// Normalized position /// </summary> public Vector Position { get => (Vector)GetValue(PositionProperty); set => SetValue(PositionProperty, value); } /// <summary> /// Field of the "Position" /// </summary> public static readonly DependencyProperty PositionProperty = DependencyProperty.Register( nameof(Position), typeof(Vector), typeof(Stick), new FrameworkPropertyMetadata( default(Vector), (FrameworkPropertyMetadataOptions.BindsTwoWayByDefault | FrameworkPropertyMetadataOptions.AffectsRender), OnPositionChanged, CoercePositionNormalized ) ); /// <summary> /// Position changed event handler /// </summary> /// <param name="d">The object</param> /// <param name="ev">The event</param> private static void OnPositionChanged( DependencyObject d, DependencyPropertyChangedEventArgs ev ) { if (d is Stick stick) { stick.UpdateRawPosition(); } } /// <summary> /// Coerce value of the "Position" /// </summary> /// <param name="d">The object</param> /// <param name="value">The value</param> /// <returns>Corrected value</returns> private static object CoercePositionNormalized( DependencyObject d, object value ) { var vector = (Vector)value; vector.X = Math.Clamp(vector.X, -1.0, 1.0); vector.Y = Math.Clamp(vector.Y, -1.0, 1.0); return vector; } /// <summary> /// Field key of the "RawPosition" /// </summary> private static readonly DependencyPropertyKey RawPositionPropertyKey = DependencyProperty.RegisterReadOnly( nameof(RawPosition), typeof(Vector), typeof(Stick), new PropertyMetadata(default(Vector)) ); /// <summary> /// Field of the "RawPosition" /// </summary> public static readonly DependencyProperty RawPositionProperty = RawPositionPropertyKey.DependencyProperty; /// <summary> /// Raw (pixel) position /// </summary> public Vector RawPosition => (Vector)GetValue(RawPositionProperty); /// <summary> /// Set raw position /// </summary> private void UpdateRawPosition() { var rawPosition = new Vector(Position.X * _radius, -(Position.Y * _radius)); SetValue(RawPositionPropertyKey, rawPosition); } } }- Stick コントロールに、「ノブ」位置を示す Vector 型の Position プロパティを追加するためのファイルです。
ここでビルドして、.xaml のデザインビューに Stick が表示されるようにします。
DockingWindow フォルダーの DockingWindowContent.xaml ファイルを編集します。
- 元からある DockPanel は削除します。
- かわりに、3 行 3 列の Grid を配置し、各セルには以下を配置します。以下、0 オリジンとして、R 行 C 列は、(R, C) で示します。
- 3 行目、3 列目は、Height、Width を * とします。これらは余白で、Grid は実質 2 行 2 列です。
- (0, 0): DockPanel を配置し、中に Label「Motor:」、Border、Button、TextBlock を入れます。
- Border は、IsMotorOn(
ReactivePropertySlim<bool>)と MotorState(ReactivePropertySlim<string>)を参照して、モーター状態を示すインジケータです。モーターがオンのときは、緑地に白抜きの ON、オフのときは、ライトグレーに黒文字の OFF を表示します。 - Button は、モーターオン/オフの切り換え用です。
- Content は、Captions[LabelToggle].Value にバインドします。
- Command は、MotorToggleCommand(ReactiveCommand) にバインドします。
- IsEnabled は、IsOnline.Value にバインドします。IsOnline(
ReactivePropertySlim<bool>)は、ロボットコントローラーとの接続が確立されている場合に true となるフラグです。
- TextBlock の Text は、APIResult.Value にバインドします。APIResult(
ReactivePropertySlim<string>)は、この Extension のデバッグ用で、呼び出した Extensions API コールのステータス(RCXResult 型)の文字列表現です。API によっては、ステータス以外に情報を返すものがあるので、その場合の付帯情報を示すために、APIResultAux(ReactivePropertySlim<string>)を用意して、APIResultAux.Value を ToolTip にバインドしておきます。
- Border は、IsMotorOn(
- (1. 0): 3 行 4 列の Grid を配置し、中に座標方向を示す Label 6 つと、Stick 2 つを入れます。
- Stick は、サイズを変更できるようにするため、Viewbox で包みます。
- IsEnabled は、IsMotorOn.Value にバインドします。
- Position は、左 Stick については、LeftStickPosition.Value にバインドします。LeftStickPosition(
ReactivePropertySlim<Vector>)は、左 Stick の「ノブ」位置です。右 Stick についても同様です。
- Stick は、サイズを変更できるようにするため、Viewbox で包みます。
- (0, 1): Label です。Content を Captions[CaptionLogHeader].Value にバインドします。
- (1, 1): DockPanel を配置し、中に Button と ListBox を入れます。
- Button は、ティーチ用です。
- Content は、Captions[LabelTeach].Value にバインドします。
- Command は、TeachCommand(ReactiveCommand)にバインドします。
- IsEnabled は、CanTeach.Value にバインドします。CanTeach(
ReactivePropertySlim<bool>)は、ティーチ可能か否かを示すフラグです。
- ListBox は、ティーチしたポイントの情報を記録するログです。
- ItemsSource を LogItems(
ReactiveCollection<LogItem>)にバインドします。LogItem は、この後作成します。 - 末尾に追加される最新のログ情報が表示されるよう、AutoScrollBehavior を設定します。AutoScrollBehavior もこのあと作成します。
- ItemsSource を LogItems(
- Button は、ティーチ用です。
<UserControl x:Class="SimpleJog.DockingWindow.DockingWindowContent"
            xmlns="http://schemas.microsoft.com/winfx/2006/xaml/presentation"
            xmlns:x="http://schemas.microsoft.com/winfx/2006/xaml"
            xmlns:mc="http://schemas.openxmlformats.org/markup-compatibility/2006"
            xmlns:d="http://schemas.microsoft.com/expression/blend/2008"
            xmlns:i="http://schemas.microsoft.com/xaml/behaviors"
            xmlns:local="clr-namespace:SimpleJog.DockingWindow"
            mc:Ignorable="d"
            d:DesignHeight="450" d:DesignWidth="800">

    <UserControl.DataContext>
        <local:DockingWindowContentViewModel />
    </UserControl.DataContext>

    <Grid
        Margin="10">

        <Grid.RowDefinitions>
            <RowDefinition Height="30" />
            <RowDefinition Height="Auto" />
            <RowDefinition Height="*" />
        </Grid.RowDefinitions>

        <Grid.ColumnDefinitions>
            <ColumnDefinition Width="Auto" />
            <ColumnDefinition Width="Auto" />
            <ColumnDefinition Width="*" />
        </Grid.ColumnDefinitions>

        <DockPanel
            Grid.Row="0" Grid.Column="0"
            LastChildFill="True">

            <Label
                Content="Motor:"
                VerticalAlignment="Center" />

            <Border
                CornerRadius="10"
                Width="60"
                Height="20"
                Margin="10,0,0,0"
                VerticalAlignment="Center">
                <TextBlock
                    Text="{Binding MotorState.Value}"
                    HorizontalAlignment="Center"
                    VerticalAlignment="Center">
                    <TextBlock.Style>
                        <Style
                            TargetType="TextBlock">
                            <Style.Triggers>
                                <DataTrigger
                                    Binding="{Binding IsMotorOn.Value}"
                                    Value="True">
                                    <Setter
                                        Property="Foreground"
                                        Value="White" />
                                </DataTrigger>
                                <DataTrigger
                                    Binding="{Binding IsMotorOn.Value}"
                                    Value="False">
                                    <Setter
                                        Property="Foreground"
                                        Value="Black" />
                                </DataTrigger>
                        </Style.Triggers>
                        </Style>
                    </TextBlock.Style>
                </TextBlock>
                <Border.Style>
                    <Style
                        TargetType="Border">
                        <Style.Triggers>
                            <DataTrigger
                                Binding="{Binding IsMotorOn.Value}"
                                Value="True">
                                <Setter
                                    Property="Background"
                                    Value="#00bb00" />
                            </DataTrigger>
                            <DataTrigger
                                Binding="{Binding IsMotorOn.Value}"
                                Value="False">
                                <Setter
                                    Property="Background"
                                    Value="LightGray" />
                            </DataTrigger>
                        </Style.Triggers>
                    </Style>
                </Border.Style>
            </Border>

            <Button
                Command="{Binding MotorToggleCommand}"
                IsEnabled="{Binding IsOnline.Value}"
                Content="{Binding Captions[LabelToggle].Value}"
                Width="90"
                Margin="10,0,0,0"
                VerticalAlignment="Center" />

            <TextBlock
                Text="{Binding APIResult.Value}"
                ToolTip="{Binding APIResultAux.Value}"
                TextAlignment="Right"
                VerticalAlignment="Center"
                Margin="10,0,20,0" />

        </DockPanel>

        <Grid
            Grid.Row="1" Grid.Column="0"
            Margin="0,10,0,0">

            <Grid.Resources>
                <Style
                    TargetType="Label">
                    <Setter
                        Property="FontSize"
                        Value="16" />
                </Style>
            </Grid.Resources>

            <Grid.RowDefinitions>
                <RowDefinition Height="Auto" />
                <RowDefinition Height="Auto" />
                <RowDefinition Height="Auto" />
            </Grid.RowDefinitions>

            <Grid.ColumnDefinitions>
                <ColumnDefinition Width="Auto" />
                <ColumnDefinition Width="Auto" />
                <ColumnDefinition Width="Auto" />
                <ColumnDefinition Width="Auto" />
            </Grid.ColumnDefinitions>

            <Label
                Grid.Row="0" Grid.Column="0"
                Content="+Z"
                HorizontalAlignment="Center" />
            <Label
                Grid.Row="2" Grid.Column="0"
                Content="-Z"
                HorizontalAlignment="Center" />
            <Viewbox
                Grid.Row="1" Grid.Column="0"
                Width="200">
                <local:Stick
                    IsEnabled="{Binding IsMotorOn.Value}"
                    Position="{Binding InputService.LeftStickPosition.Value}" />
            </Viewbox>

            <Label
                Grid.Row="1" Grid.Column="1"
                Content="-X"
                Margin="20,0,0,0"
                VerticalAlignment="Center" />
            <Label
                Grid.Row="1" Grid.Column="3"
                Content="+X"
                Margin="0,0,10,0"
                VerticalAlignment="Center" />
            <Label
                Grid.Row="0" Grid.Column="2"
                Content="+Y"
                HorizontalAlignment="Center" />
            <Label
                Grid.Row="2" Grid.Column="2"
                Content="-Y"
                HorizontalAlignment="Center" />
            <Viewbox
                Grid.Row="1" Grid.Column="2"
                Width="200">
                <local:Stick
                    IsEnabled="{Binding IsMotorOn.Value}"
                    Position="{Binding InputService.RightStickPosition.Value}" />
            </Viewbox>

        </Grid>

        <Label
            Grid.Row="0" Grid.Column="1"
            Content="{Binding Captions[CaptionLogHeader].Value}"
            VerticalAlignment="Center" />

        <DockPanel
            Grid.Row="1" Grid.Column="1"
            LastChildFill="True">

            <Button
                DockPanel.Dock="Bottom"
                Command="{Binding TeachCommand}"
                IsEnabled="{Binding CanTeach.Value}"
                Content="{Binding Captions[LabelTeach].Value}"
                Width="100"
                Margin="0,10,0,0"
                HorizontalAlignment="Center" />

            <ListBox
                x:Name="TeachingLog"
                ItemsSource="{Binding LogItems}"
                Width="200">
                <i:Interaction.Behaviors>
                    <local:AutoScrollBehavior />
                </i:Interaction.Behaviors>
            </ListBox>

        </DockPanel>

    </Grid>

</UserControl>
DockingWindow フォルダーに、LogItem.cs ファイルを作成します。
この Extension では、ティーチのログとして、ポイント番号と、ワールド座標での X, Y, Z の値を示すことにします。
(前略)

namespace SimpleJog.DockingWindow
{
    using static Epson.RoboticsShared.ExtensionsAPI.IRCXRobotManagerAPI;

    /// <summary>
    /// Teaching log list box item
    /// </summary>
    public class LogItem
    {
        /// <summary>
        /// Point number
        /// </summary>
        public int PointNumber { get; }

        /// <summary>
        /// Point position
        /// </summary>
        public IDictionary<RCXJogCartesianAxis, double>? WorldPosition { get; }

        /// <inheritdoc />
        public override string ToString()
        {
            if (WorldPosition == null)
            {
                return $"P{PointNumber}";
            }
            else
            {
                var x = WorldPosition[RCXJogCartesianAxis.X];
                var y = WorldPosition[RCXJogCartesianAxis.Y];
                var z = WorldPosition[RCXJogCartesianAxis.Z];

                return $"P{PointNumber}  X: {x:f2}, Y: {y:f2}, Z: {z:f2}";
            }
        }

        (後略)
DockingWindow フォルダーに、AutoScrollBehavior.cs ファイルを作成します。
- 純粋に WPF だけに関連しますので、詳細は省きます。
DockingWindow フォルダーの DockingWindowContentViewModelAddition.cs ファイルを編集します。
.xaml でバインドしたプロパティとコマンドを追加します。
ロボットコントローラーと接続されているか否かは、コントローラー接続 API の IsOnline プロパティを参照します。IsOnline は、接続が確立されている場合は true、切断されている場合は false で、それ以外(接続を確立しようとしているなどの中間状態)は null です。接続状態が変更された場合は、PropertyChanged イベントが発生します。
- ObserveProperty(x => x.PropName).Subscribe(...) は、PropName という名前のプロパティを持つ API オブジェクトの、プロパティ変更を監視する定番の方法です。この Extension でも、活用されています。
モーター状態は、コントローラー API の IsMotorOn プロパティを参照します。IsMotorOn は、コントローラーがエラー状態になっているなどの理由で null になる場合があります。モーター状態の変更に伴って、PropertyChanged イベントが発生します。
ジョグを行うには、Jogger オブジェクトを使います。ロボットマネージャー API オブジェクトを取得して、CreateJoggerAsync メソッドを呼び出すと、Jogger オブジェクトが得られます。Jogger オブジェクトには IsValid フラグがあり、これが true の場合のみ、機能が実行可能です。Jogger オブジェクトのメソッドを呼び出す際は、このフラグを確認するようにしてください。コントローラー切断などで Jogger オブジェクトが無効になった場合は、Jogger オブジェクトを再度生成してください。
- ジョグに関するパラメーター(ジョグ移動距離、速度など)は、RC+ 全体で共有されています。RC+ 本体の「ジョグ&ティーチ」での変更は、基本的には SimpleJog にも適用されます。今回は、SimpleJog でのパラメーター変更は実装しませんので、必要に応じて本体の「ジョグ&ティーチ」を併用してください。
- スティック位置に応じて、ジョグ移動距離を設定する(小さく動かすと短い距離の移動、大きく動かすと長い距離の移動、など)という拡張も考えられます。
- ゲームパッドを使う場合、スティックの操作は、左右同時に行うことができます。現在の API では、複数の方向を指定してジョグを行う機能はありません。したがって、この Extension では、Jogger オブジェクトの生成と同時にタイマーを起動し、タイマーの周期で取得したスティック位置に基づいて、各軸方向のジョグを順次行う、ラウンドロビンアルゴリズムを用いています。複数のジョグタスクを同時に実行することは禁止されているため、前の周期で開始されたジョグが終了していない場合は、新しいジョグ開始がエラーとなります。
- 継続中のジョグをキャンセルして、新たなジョグを開始する、という実装もあり得ます。
- ジョグに関するパラメーター(ジョグ移動距離、速度など)は、RC+ 全体で共有されています。RC+ 本体の「ジョグ&ティーチ」での変更は、基本的には SimpleJog にも適用されます。今回は、SimpleJog でのパラメーター変更は実装しませんので、必要に応じて本体の「ジョグ&ティーチ」を併用してください。
ポイントファイルは、ポイント API オブジェクトの PointFileDescriptors プロパティから得ることができます。この Extension では、現在のロボットの位置姿勢をティーチしたいため、コントローラーに複数のロボットが接続されている場合は、基本的には現在のロボットに紐づくか、共通のポイントファイルにティーチする必要があります。
- この Extension では、現在のロボットのデフォルトポイントファイルか、それが得られない場合は、共通のポイントファイルのどれかを対象としてティーチします。対象のポイントファイルが見つからなかった場合、CanTeach.Value を false として、ティーチボタンとコマンドを無効化します。
- 現在のロボットのロボット番号は、ロボットマネージャー API の CurrentRobotNumber プロパティで取得します。現在のロボットを切り替えた場合は、このプロパティの PropertyChanged イベントが発生しますので、そのタイミングで対象のポイントファイルを選び直します。
(前略)

namespace SimpleJog.DockingWindow
{
    (中略)

    /// <summary>
    /// Extension : Docking Window (Specific Part)
    /// </summary>
    internal partial class DockingWindowContentViewModel
    {
        /// <summary>
        /// The controller is online or not
        /// </summary>
        public ReactivePropertySlim<bool> IsOnline { get; } = new(false);

        /// <summary>
        /// Motors are powered or not
        /// </summary>
        public ReactivePropertySlim<bool> IsMotorOn { get; } = new(false);

        /// <summary>
        /// Motor state expression
        /// </summary>
        public ReactivePropertySlim<string> MotorState { get; } = new("Off");

        /// <summary>
        /// Toggle motor state command
        /// </summary>
        public AsyncReactiveCommand MotorToggleCommand { get; }

        /// <summary>
        /// TeachCommand feasibility
        /// </summary>
        public ReactivePropertySlim<bool> CanTeach { get; } = new(false);

        /// <summary>
        /// Teach command
        /// </summary>
        public AsyncReactiveCommand TeachCommand { get; }

        /// <summary>
        /// Teached points information for log
        /// </summary>
        public ReactiveCollection<LogItem> LogItems { get; } = [];

        /// <summary>
        /// API result expression
        /// </summary>
        public ReactivePropertySlim<string> APIResult { get; } = new();

        /// <summary>
        /// Auxiliary information for API result (Error message etc.)
        /// </summary>
        public ReactivePropertySlim<string> APIResultAux { get; } = new();

        /// <summary>
        /// Controller connection API object
        /// </summary>
        private IRCXControllerConnectionAPI? _connectionAPI;

        /// <summary>
        /// Controller API object
        /// </summary>
        private IRCXControllerAPI? _controllerAPI;

        /// <summary>
        /// Robot manager API object
        /// </summary>
        private IRCXRobotManagerAPI? _robotManagerAPI;

        /// <summary>
        /// Point API object
        /// </summary>
        private IRCXPointAPI? _pointAPI;

        /// <summary>
        /// Jogger object
        /// </summary>
        private IRCXRobotManagerAPI.IRCXJogger? _jogger;

        /// <summary>
        /// Polling timer
        /// </summary>
        private PeriodicTimer? _pollingTimer;

        /// <summary>
        /// Polling task
        /// </summary>
        private Task? _pollingTask;

        /// <summary>
        /// Next axis to jog
        /// </summary>
        private IRCXRobotManagerAPI.RCXJogCartesianAxis _targetAxis = IRCXRobotManagerAPI.RCXJogCartesianAxis.Z;

        /// <summary>
        /// Polling interval
        /// </summary>
        private const long _pollingMSec = 10;

        /// <summary>
        /// Target point file for teaching
        /// </summary>
        private string? _targetPointFile;

        /// <summary>
        /// Toggles the motor state
        /// </summary>
        /// <returns>Task</returns>
        private async Task OnMotorToggleAsync()
        {
            if (_controllerAPI != null)
            {
                if (_controllerAPI.IsMotorOn == true)
                {
                    var result = await _controllerAPI.MotorOffAsync();
                    APIResult.Value = result.ToString();
                    APIResultAux.Value = string.Empty;
                }
                else if (_controllerAPI.IsMotorOn == false)
                {
                    var result = await _controllerAPI.MotorOnAsync();
                    APIResult.Value = result.ToString();
                    APIResultAux.Value = string.Empty;
                }
            }
        }

        /// <summary>
        /// Jog along specified axis
        /// </summary>
        /// <param name="axis">Axis</param>
        /// <param name="position">Stick position</param>
        /// <returns>Task</returns>
        private async Task Jog(
            IRCXRobotManagerAPI.RCXJogCartesianAxis axis,
            double position
        )
        {
            if (_jogger != null && _jogger.IsValid)
            {
                var oppositeDirection = (position > 0);
                var (result, message) = await _jogger.StartCartesianJogAsync(axis, oppositeDirection);
                APIResult.Value = result.ToString() + (string.IsNullOrEmpty(message) ? string.Empty : " *");
                APIResultAux.Value = message;
            }
        }

        /// <summary>
        /// Check the stick positions and jog
        /// </summary>
        /// <returns>Task</returns>
        private async Task CheckStickPosition()
        {
            switch (_targetAxis)
            {
                case IRCXRobotManagerAPI.RCXJogCartesianAxis.X:
                    if (Math.Abs(RightStickPosition.Value.X) >= _positionThreshold)
                    {
                        await Jog(_targetAxis, RightStickPosition.Value.X);
                    }
                    _targetAxis = IRCXRobotManagerAPI.RCXJogCartesianAxis.Y;
                    break;

                case IRCXRobotManagerAPI.RCXJogCartesianAxis.Y:
                    if (Math.Abs(RightStickPosition.Value.Y) >= _positionThreshold)
                    {
                        await Jog(_targetAxis, RightStickPosition.Value.Y);
                    }
                    _targetAxis = IRCXRobotManagerAPI.RCXJogCartesianAxis.Z;
                    break;

                case IRCXRobotManagerAPI.RCXJogCartesianAxis.Z:
                    if (Math.Abs(LeftStickPosition.Value.Y) >= _positionThreshold)
                    {
                        await Jog(_targetAxis, LeftStickPosition.Value.Y);
                    }
                    _targetAxis = IRCXRobotManagerAPI.RCXJogCartesianAxis.X;
                    break;
            }
        }

        /// <summary>
        /// Set target point file
        /// </summary>
        /// <param name="robotNumber">Robot number</param>
        private void SetTargetPointFile(
            int? robotNumber
        )
        {
            _targetPointFile = null;

            if (_pointAPI != null)
            {
                var descriptors = _pointAPI.PointFileDescriptors;

                _targetPointFile = descriptors
                    .Where(x => x.RobotNumber == robotNumber && x.IsDefault)
                    .Select(x => x.FileName)
                    .FirstOrDefault();

                if (_targetPointFile == null)
                {
                    _targetPointFile = descriptors
                        .Where(x => x.RobotNumber == null)
                        .Select(x => x.FileName)
                        .FirstOrDefault();
                }
            }

            CanTeach.Value = (IsOnline.Value && !string.IsNullOrEmpty(_targetPointFile));
        }

        /// <summary>
        /// Teach point
        /// </summary>
        /// <returns>Task</returns>
        private Task OnTeachAsync()
        {
            if (_pointAPI != null && _targetPointFile != null)
            {
                var (result, points) = _pointAPI.GetPoints(_targetPointFile);
                if (result == RCXResult.Success && points != null)
                {
                    var pointNumbers = points.Select(x => (int)x["Number"].Value).ToHashSet();
                    var pointNumberRange = Enumerable.Range(
                        _pointAPI.PointNumberMin,
                        _pointAPI.PointNumberMax - _pointAPI.PointNumberMin + 1
                    );
                    foreach (var number in pointNumberRange)
                    {
                        if (!pointNumbers.Contains(number))
                        {
                            var stamp = DateTime.Now.ToString("yyyy-MM-dd HH:mm:ss");

                            var teachResult = _pointAPI.TeachPoint(
                                _targetPointFile,
                                number,
                                description: $"SimpleJog: {stamp}",
                                shouldSave: true
                            );
                            APIResult.Value = teachResult.ToString();
                            APIResultAux.Value = string.Empty;

                            if (teachResult == RCXResult.Success)
                            {
                                LogItems.Add(new(number, _robotManagerAPI?.WorldPosition));
                            }
                            break;
                        }
                    }
                }
            }

            return Task.CompletedTask;
        }

        /// <summary>
        /// Constructor
        /// </summary>
        public DockingWindowContentViewModel()
        {
            MotorToggleCommand = IsOnline
            .ToAsyncReactiveCommand()
            .WithSubscribe(OnMotorToggleAsync)
            .AddTo(_disposables);

            TeachCommand = CanTeach
            .ToAsyncReactiveCommand()
            .WithSubscribe(OnTeachAsync)
            .AddTo(_disposables);
        }

        /// <inheritdoc />
        public Task WindowCreated()
        {
            _connectionAPI = Main.GetAPI<IRCXControllerConnectionAPI>();

            _connectionAPI?.ObserveProperty(x => x.IsOnline).Subscribe((isOnline) =>
            {
                IsOnline.Value = (isOnline == true);

                CanTeach.Value = (IsOnline.Value && !string.IsNullOrWhiteSpace(_targetPointFile));
            })
            .AddTo(_disposables);

            _controllerAPI = Main.GetAPI<IRCXControllerAPI>();
            _robotManagerAPI = Main.GetAPI<IRCXRobotManagerAPI>();
            _pointAPI = Main.GetAPI<IRCXPointAPI>();

            _controllerAPI?.ObserveProperty(x => x.IsMotorOn).Subscribe(async (isMotorOn) =>
            {
                IsMotorOn.Value = (isMotorOn == true);
                MotorState.Value = (isMotorOn == true) ? "On" : "Off";

                if (_robotManagerAPI != null)
                {
                    if (isMotorOn == true)
                    {
                        _jogger = await _robotManagerAPI.CreateJoggerAsync();
                        _pollingTimer = new PeriodicTimer(TimeSpan.FromMilliseconds(_pollingMSec));
                        _pollingTask = Task.Factory.StartNew(async () =>
                        {
                            while (await _pollingTimer.WaitForNextTickAsync())
                            {
                                await CheckStickPosition();
                            }
                        });
                    }
                    else
                    {
                        if (_jogger != null)
                        {
                            await _jogger.DisposeAsync();
                            _jogger = null;
                        }
                        _pollingTask?.Dispose();
                        _pollingTimer?.Dispose();
                    }

                }
            })
            .AddTo(_disposables);

            _robotManagerAPI?.ObserveProperty(x => x.CurrentRobotNumber).Subscribe((robotNumber) =>
            {
                SetTargetPointFile(robotNumber);
            })
            .AddTo(_disposables);

            return Task.CompletedTask;
        }
    }
}
MainMenuItem.cs ファイルを編集します。
ジョグは、ロボットコントローラー(仮想または実機)との接続が確立している状態を前提としています。そこで、ツールバーからウィンドウを開く場合に、接続がなければコントローラー接続を行うようにしてみます。
- コントローラーに接続するには、コントローラー接続 API を用います。ConnectControllerAsync メソッドは、RC+本体でコントローラー接続されるのと同様で、自動接続の場合は、前回接続したコントローラーに接続しようとします。自動接続でない場合は、「PC とコントローラー接続」画面が表示されます。
(前略)
        /// <inheritdoc />
        public async Task ExecuteMainMenuItemCommandAsync(
            string commandName,
            bool fromToolBar
        )
        {
            if (fromToolBar)
            {
                var controllerConnectionAPI = Main.GetAPI<IRCXControllerConnectionAPI>();
                if (controllerConnectionAPI?.IsOnline == false)
                {
                    _ = await controllerConnectionAPI.ConnectControllerAsync().ConfigureAwait(true);
                }
            }

            await DockingWindowContentViewModel.Show();
        }
(後略)
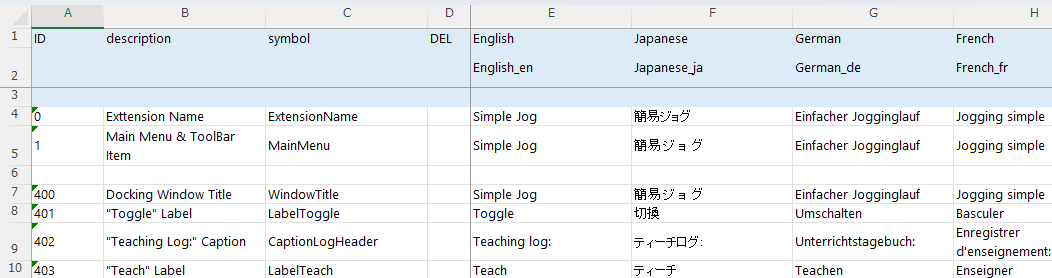
Captions.xlsx ファイルを編集します。
ビルド、デバッグします。
- Extenion の画面と、ロボットマネージャーの「ジョグ&ティーチ」、さらに「シミュレーター」画面を開いて、ロボットが動くかをお試しください。
- ロボットの位置姿勢によっては、直交座標に沿ったジョグができない場合があります。その場合は、他の方法でロボットの位置姿勢を変更してから操作してみてください。
- Extenion の画面と、ロボットマネージャーの「ジョグ&ティーチ」、さらに「シミュレーター」画面を開いて、ロボットが動くかをお試しください。
■ 中級編
中級編では、入力デバイスとして、ゲームパッドを使えるようにします。(Xbox Wireless Controller で動作確認しています。)
Visual Studio のソリューションエクスプローラーで、SimpleJog プロジェクトをダブルクリックし、以下を変更します。
- TargetFramework を、net8.0-windows10.0.19041.0 に変更します。
- これにより、Windows ランタイム(WinRT)にある Windows.Gaming.Input API を使って、簡単にゲームパッドが取り扱えるようになります。
- TargetFramework を、net8.0-windows10.0.19041.0 に変更します。
install.json ファイルを編集します。
このファイルは、以下を指定するものです。
- ビルド出力フォルダー以外で、別にコピーする必要がある Extension が使うコンテンツなどのフォルダー
- Extension 本体とともに明示的に読み込む必要があるアセンブリ
ここでは、以下の内容とします。
{
    "Contents": [
    ],
    "Dependents": [
        "Microsoft.Windows.SDK.NET.dll",
        "WinRT.Runtime.dll"
    ]
}
DockingWindow フォルダーに、以下のファイルを追加します。
GamepadInfo.cs
ゲームパッドを識別するための情報である GamepadInfo クラスを記述するファイルです。
- Windows.Gaming.Input の Gamepad クラス単体では、仕様上の制約として、人間にわかりやすい名前などを取得することができません。そのため、この Extension では、単に見つかった順番で、ゲームパッドが識別できるようにします。
(前略)

namespace SimpleJog.DockingWindow
{
    using Windows.Gaming.Input;

    /// <summary>
    /// Gamepad information
    /// </summary>
    public class GamepadInfo
    {
        /// <summary>
        /// Gamepad object
        /// </summary>
        public Gamepad Gamepad { get; }

        /// <summary>
        /// Gamepad number
        /// </summary>
        public int Number { get; }

        /// <summary>
        /// Gamepad name
        /// </summary>
        public string Name => $"Gamepad #{Number}";

        /// <summary>
        /// Constructor
        /// </summary>
        /// <param name="gamepad">Gamepad object</param>
        /// <param name="number">Gamepad number</param>
        public GamepadInfo(
            Gamepad gamepad,
            int number
        )
        {
            Gamepad = gamepad;
            Number = number;
        }
    }
}
IGamepadInputService.cs
この Extension で用いる、ゲームパッド入力のインターフェイス IGamepadInputService を記述するファイルです。
(前略)

namespace SimpleJog.DockingWindow
{
    using Reactive.Bindings;
    using Windows.Gaming.Input;

    /// <summary>
    /// Interface of gamepad input service
    /// </summary>
    public interface IGamepadInputService
    {
        /// <summary>
        /// Property for current reading
        /// </summary>
        public IReadOnlyReactiveProperty<GamepadReading> CurrentReading { get; }

        /// <summary>
        /// Set target gamepad
        /// </summary>
        /// <param name="gamepad">Gamepad object</param>
        public void SetGamepad(
            Gamepad gamepad
        );

        /// <summary>
        /// Start service
        /// </summary>
        public void Start();

        /// <summary>
        /// Stop service
        /// </summary>
        public void Stop();
    }
}
GamepadInputService.cs
IGamepadInputService インターフェースを実装する GamepadInputService クラスを記述するファイルです。
- タイマーを使って、ポーリングし、入力を更新しています。ただし、マウスボタンが押されているときは、更新をスキップします。DispatcherTimer の Tick は、UI スレッドで呼ばれるため、System.Windows.Input の Mouse インスタンスにアクセスできます。
(前略)

namespace SimpleJog.DockingWindow
{
    using Reactive.Bindings;
    using System.Windows.Threading;
    using Windows.Gaming.Input;

    /// <summary>
    /// Implementation of gamepad input service
    /// </summary>
    public class GamepadInputService : IGamepadInputService
    {
        /// <inheritdoc />
        public IReadOnlyReactiveProperty<GamepadReading> CurrentReading => _reading;

        /// <summary>
        /// The substance of CurrentReading
        /// </summary>
        private readonly ReactivePropertySlim<GamepadReading> _reading = new(mode: ReactivePropertyMode.None);

        /// <summary>
        /// Target gamepad
        /// </summary>
        private Gamepad? _gamepad;

        /// <summary>
        /// Timer for polling
        /// </summary>
        private DispatcherTimer _timer;

        /// <summary>
        /// Polling interval
        /// </summary>
        private const int _pollingIntervalMSec = 16;

        /// <summary>
        /// Constructor
        /// </summary>
        public GamepadInputService()
        {
            _timer = new()
            {
                Interval = TimeSpan.FromMilliseconds(_pollingIntervalMSec),
            };

            _timer.Tick += (_, _) =>
            {
                if (_gamepad != null)
                {
                    if (Mouse.LeftButton == MouseButtonState.Pressed)
                    {
                        return;
                    }

                    _reading.Value = _gamepad.GetCurrentReading();
                }
            };
        }

        /// <inheritdoc />
        public void SetGamepad(
            Gamepad? gamepad
        )
        {
            _gamepad = gamepad;
        }

        /// <inheritdoc />
        public void Start()
        {
            _timer.Start();
        }

        /// <inheritdoc />
        public void Stop()
        {
            _timer.Stop();
        }
    }
}
InputService.cs
ゲームパッドの入力を、この Extension 用の入力に変換するサービスである InputService クラスを記述するファイルです。
- Stick のマウス処理にも同様の記述がありますが、デッドゾーンとスムージングの処理もここで行います。ゲームパッドのスティックは、ニュートラルの位置でも、値としてはゼロになっていない場合があります。特定の範囲で、これをゼロとみなすのがデッドゾーンの処理です。また、スティックの動きが急でも、値としては多少緩やかに変化するように調整するのがスムージングの処理です。
(前略)

namespace SimpleJog.DockingWindow
{
    (中略)

    /// <summary>
    /// Input service
    /// </summary>
    public class InputService : IDisposable
    {
        /// <summary>
        /// State of gamepad buttons
        /// </summary>
        public ReactivePropertySlim<GamepadButtons> Buttons { get; } = new(GamepadButtons.None);

        /// <summary>
        /// Left stick position
        /// </summary>
        public ReactivePropertySlim<Vector> LeftStickPosition { get; } = new();

        /// <summary>
        /// Right stick position
        /// </summary>
        public ReactivePropertySlim<Vector> RightStickPosition { get; } = new();

        /// <summary>
        /// Stores the most recently calculated smoothed position for the left stick.
        /// </summary>
        private Vector _leftSmoothedPosition;

        /// <summary>
        /// Stores the most recently calculated smoothed position for the right stick.
        /// </summary>
        private Vector _rightSmoothedPosition;

        /// <summary>
        /// Dead zone definition
        /// </summary>
        private const double _deadZoneFactor = 0.05;

        /// <summary>
        /// Represents the smoothing factor used in calculations that require exponential smoothing.
        /// </summary>
        /// <remarks>This constant determines the weight given to new data points versus historical data
        /// in smoothing algorithms. A lower value results in smoother output but slower response to changes.</remarks>
        private const double _smoothingFactor = 0.2;

        /// <summary>
        /// Disposables
        /// </summary>
        private readonly CompositeDisposable _disposables = [];

        /// <summary>
        /// Constructor
        /// </summary>
        /// <param name="gamepadInputService">Gamepad input service</param>
        public InputService(
            IGamepadInputService gamepadInputService
        )
        {
            gamepadInputService.CurrentReading.Subscribe((reading) =>
            {
                Buttons.Value = reading.Buttons;

                _leftSmoothedPosition = AdjustPosition(
                    new Vector(reading.LeftThumbstickX, reading.LeftThumbstickY),
                    _leftSmoothedPosition
                );
                _rightSmoothedPosition = AdjustPosition(
                    new Vector(reading.RightThumbstickX, reading.RightThumbstickY),
                    _rightSmoothedPosition
                );

                LeftStickPosition.Value = _leftSmoothedPosition;
                RightStickPosition.Value = _rightSmoothedPosition;
            })
            .AddTo(_disposables);
        }

        /// <summary>
        /// Dead zone check and smoothing
        /// </summary>
        /// <param name="currentPosition">Current stick position</param>
        /// <param name="lastPosition">Last stick position</param>
        /// <returns>Adjusted stick position</returns>
        private Vector AdjustPosition(
            Vector currentPosition,
            Vector lastPosition
        )
        {
            var distance = Math.Sqrt(
                Math.Pow(currentPosition.X, 2.0)
                + Math.Pow(currentPosition.Y, 2.0)
            );

            if (distance < _deadZoneFactor)
            {
                return new Vector();
            }
            else
            {
                return new Vector(
                    lastPosition.X * (1.0 - _smoothingFactor) + currentPosition.X * _smoothingFactor,
                    lastPosition.Y * (1.0 - _smoothingFactor) + currentPosition.Y * _smoothingFactor
                );
            }
        }

        /// <inheritdoc />
        public void Dispose()
        {
            _disposables.Dispose();
        }
    }
}
DockingWindow フォルダーの DockingWindowContent.xaml ファイルを編集します。
最上位の Grid に列を追加し、ゲームパッドを選択するための ComboBox を配置します。
- ItemsSource は、Gamepads(
ReactiveCollection<GamepadInfo>)にバインドします。 - SelectedIndex は、SelectedGamepadIndex.Value にバインドします。SelectedGamepadIndex は
ReactivePropertySlim<int>です。
- ItemsSource は、Gamepads(
Stick にバインドしていた LeftStickPosition および RightStickPosition を、InputService.LeftStickPosition および InputService.RightStickPosition にそれぞれ変更します。
(前略)

        <StackPanel
            Grid.Row="2" Grid.Column="0"
            Orientation="Horizontal">

            <Label
                Content="Gamepads:"
                VerticalAlignment="Center" />
            <ComboBox
                ItemsSource="{Binding Gamepads}"
                SelectedIndex="{Binding SelectedGamepadIndex.Value}"
                DisplayMemberPath="Name"
                IsReadOnly="True"
                MinWidth="100"
                VerticalAlignment="Center"
                Margin="10,0,0,0" />

        </StackPanel>

(後略)
DockingWindow フォルダーの DockingWindowContentViewModelAddition.cs ファイルを編集します。
CheckStickPosition メソッドの LeftStickPosition などは、InputService.LeftStickPosition などに書き換えます。
ウィンドウ表示中にゲームパッドの付け外しがあると、GamepadAdded や GamepadRemoved イベントが発生します。ウィンドウ表示前に、すでにゲームパッドが接続されている場合は、これらのイベントが発生しないため、別途接続されているゲームパッドを調べる必要があります(ScanGamepads メソッド)。
ゲームパッドのボタン押下は、InputService インスタンスの Buttons プロパティを監視して、該当するコマンドを呼び出すようにします。
(前略)
        /// <summary>
        /// Input service object
        /// </summary>
        public InputService InputService { get; }

        (中略)

        /// <summary>
        /// List of connected game pads
        /// </summary>
        public ReactiveCollection<GamepadInfo> Gamepads { get; } = new();

        /// <summary>
        /// Selected game pad index
        /// </summary>
        public ReactivePropertySlim<int> SelectedGamepadIndex { get; } = new(-1);

        (中略)

        /// <summary>
        /// Gamepad input service object
        /// </summary>
        private GamepadInputService _gamepadInputService = new();

        (中略)

        /// <summary>
        /// Scans for connected gamepads
        /// </summary>
        private void ScanGamepads()
        {
            SelectedGamepadIndex.Value = -1;

            Gamepads.Clear();

            const int _waitMSec = 100;
            const int _maxRetryCount = 30;

            for (var retryCount = 0; retryCount < _maxRetryCount; retryCount++)
            {
                if (Gamepad.Gamepads.Count <= 0)
                {
                    Thread.Sleep(_waitMSec);
                }
                else
                {
                    foreach (var (gamepad, index) in Gamepad.Gamepads.Select((x, index) => (x, index)))
                    {
                        Gamepads.Add(new GamepadInfo(gamepad, 1 + index));
                    }
                    SelectedGamepadIndex.Value = 0;
                    break;
                }
            }
        }

        /// <summary>
        /// Constructor
        /// </summary>
        public DockingWindowContentViewModel()
        {
            InputService = new(_gamepadInputService);

            (中略)

            InputService.Buttons.Subscribe((buttons) =>
            {
                if ((buttons & GamepadButtons.LeftShoulder) != 0)
                {
                    MotorToggleCommand.Execute();
                }

                if ((buttons & GamepadButtons.A) != 0)
                {
                    TeachCommand.Execute();
                }
            })
            .AddTo(_disposables);

            SelectedGamepadIndex.Subscribe((index) =>
            {
                if (index >= 0)
                {
                    _gamepadInputService.SetGamepad(Gamepads[index].Gamepad);
                }
            })
            .AddTo(_disposables);

            Gamepad.GamepadAdded += (_, gamepad) =>
            {
                Gamepads.AddOnScheduler(new GamepadInfo(gamepad, Gamepads.Count));
            };

            Gamepad.GamepadRemoved += (_, gamepad) =>
            {
                var target = Gamepads.FirstOrDefault(x => ReferenceEquals(x.Gamepad, gamepad));
                if (target != null)
                {
                    Gamepads.RemoveOnScheduler(target);
                }
            };

            ScanGamepads();

            _gamepadInputService.Start();
        }

        (後略)
DockingWindow フォルダーの DockingWindowContentViewMode.cs ファイルを編集します。
ウィンドウを閉じるときには、GamepadInputService も停止させます。
(前略)

/// <inheritdoc />
public Task<bool> CloseAsync()
{
    _gamepadInputService.Stop();

    return Task.FromResult(true);
}

(後略)
ビルド、デバッグします。
- 初級編と同様に各ウィンドウを開き、ゲームパッドでの操作が行えるか確認しましょう。
- この Extension でのゲームパッド対応には、以下の制約があります。
- Extension のウィンドウにフォーカスがないと、ゲームパッドの入力は拾われません。
- 特に、API 呼び出しで確認ダイアログなどが開かれると、ダイアログのボタンをゲームパッドでクリックすることができないため、ゲームパッドでの処理を中断して、PC のマウスまたはキーボードを使わなければなりません。
- この Extension では、モーターをオンにする場合の確認ダイアログが該当します。確認ダイアログの表示を省略してもよいと判断できるケース(慎重に考慮してください)では、モーターオンの API のかわりに、SPEL+ コマンドの "Motor On" を実行することで、確認をバイパスできます。最終的なコードでは、これが実装されていますので、興味のある方はお調べください。