Property setting guidelines for the PressProbe object
Step 1. Set basic information
Set properties (Name, Description, Enabled, StepID, AbortSeqOnFail) related to the basic information.
Properties | Description, setting guide |
|---|---|
| Name | This property sets names of force guide objects. Set a particular name. |
| Description | This property sets descriptions about force guide objects. Describe the operations. Set a character string. |
| Enabled | Set whether to execute the force guide object. |
| True : Normal | |
| False : When you do not execute the force guide object (e.g., when you execute another force guide object instead). | |
| StepID | StepID during the force guide object execution. Set an ID. StepID is an ID which is recorded in the log data. It helps you to understand which log data support a process. It is applied when AutoStepID of the force guide sequence is False. |
| AbortSeqOnFail | Set whether to abort or continue the force guide sequence when the force guide object fails. |
True : Normal End a force guide sequence. | |
| False : Cases where the force guide sequence contains recovery operations in case of failure; cases where the sequence will be able to continue even in the event of a failure. |
Step 2. Set I/O processing before starting
Set properties (IOPreprocEnabled, IOPreprocOutputBit, IOPreprocOutputStatus) related to I/O processing before starting force guide object.
Properties | Description, setting guide |
|---|---|
| IOPreprocEnabled | Set whether to operate the output bit when starting the force guide object. You can operate only one output bit. To operate several output bit, use SPELFunc object. |
| False : Normal | |
| True : You operate the output bit, as when you use or stop a peripheral device. | |
| IOPreprocOutputBit | Set the output bit which is operated when the force guide object starts. |
| IOPreprocOutputStatus | Set whether to turn the output bit ON or OFF when the force guide object starts. Set the state to be output. |
Step 3. Set a probe motion
Set properties (ProbeTrajectory, ProbeDetectType, AccelS, SpeedS, SpiralDiam, SpiralPitch, DestRelativeX, DestRelativeY, DestRelativeZ) related to the probe motion.
Properties | Description, setting guide |
|---|---|
| ProbeTrajectory | Set a trajectory to probe. Select from the following depending on the detection target. |
| Spiral trajectory : When a detection target is a hole | |
| Straight line trajectory : When a detection target is an obstacle | |
| Straight : When it is clear that the target is on the specified straight line. | |
| Spiral : When the target is not on the specified straight line. | |
| ProbeDetectType | Set a target to be detected. You can select a hole and an obstacle. The obstacle is a convex shape on the plane to probe. |
| AccelS | Set the translational acceleration of the movement. Actual translational acceleration is adjusted by the force control functions. |
| SpeedS | Set the translational velocity of the movement. Actual translational velocity is adjusted by the force control functions. |
SpiralDiam SpiralPitch | Set a diameter and pitch of the spiral trajectory.
|
SpiralDiam : Set a value which is the maximum value of the distance from the start point to the detection target (positional variations are included) plus an added margin. Example: Value: 1.1 times larger than the maximum value | |
SpiralPitch : Set a value which does not pass through the detection target. When detecting a hole, set a smaller value than the minimum interval between the holes. | |
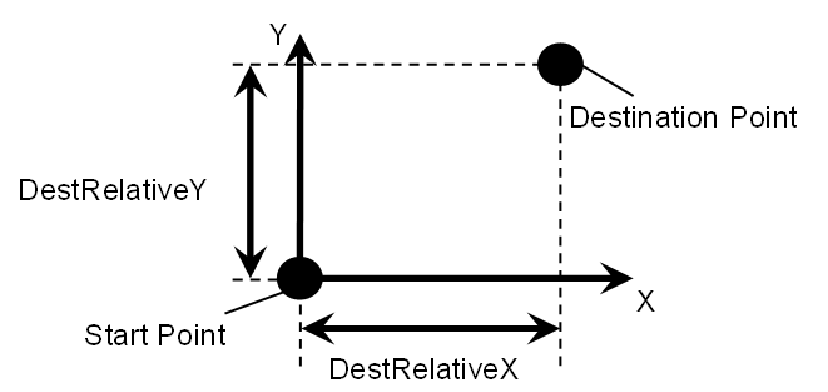
DestRelativeX DestRelativeY DestRelativeZ | Set a relative movement amount to each direction from the start point of the force guide object to the destination point. As shown below, set the movement amount in the coordinate system specified by ForceOrient of the force guide sequence.
|

Step 4. Set force control functions
Set properties (PressOrient, PressForce, PressFirmnessF, CFEnabled) related to the force control functions.
Properties | Description, setting guide |
|---|---|
| PressOrient | The direction to press. Set a vertical direction to a probe plane. To probe a detection target, move the robot along with the trajectory specified at Step.3 while pressing to the specified direction. |
| PressForce | Set the pressing force. When PressOrient is positive direction: Enter a negative value. When PressOrient is negative direction: Enter a positive value. Normally, a value of approximately 3 to 5N is set. However, set a value that is proper for your workpiece. If the value is too small, the robot may move away from the probe plane. |
| PressFirmnessF | Set a firmness of the force control functions in pressing direction. When the value increases, the force control function will become stronger and response to changes of the force is slow. When the value decreases, the force control function will become weaker. Response to changes of the force is fast, however, vibration is easy to occur. |
| CFEnabled | Set whether to continue the force control functions to the next force guide object. |
False : Normal Turn OFF the force control functions once, then execute the next force guide object. | |
True : When you want to start the next force guide object while maintaining a steady force even after the target is detected: The next force guide object must maintain the force control in the direction selected in ContactOrient. |
Step 5. Set basic information for end conditions
Set a property (EndCheckOperator) related to combinations of end conditions.
Properties | Description, setting guide |
|---|---|
| EndCheckOperator | This property sets how to combine the end conditions related to force and position. AND : End when both conditions are satisfied. OR: End when one or more conditions is satisfied. |
Step 6. Set end conditions related to force
Set properties (ForceCheckEnabled, ProbeDetectThresh) related to the end conditions of force.
Properties | Description, setting guide |
|---|---|
| ForceCheckEnabled | This property sets whether to enable the end conditions of force. You need to enable ForceCheckEnabled and/or PosCheckEnabled in the PressProbe object. |
True : When enabling the end conditions related to force. Select when ProbeDetectType is Obstacle. When ProbeDetectType is Hole, select True if necessary. | |
| ProbeDetectThresh | Set a threshold to determine that the target is detected. |
When ProbeDetectType is Hole: Threshold for the direction specified by PressOrient When PressOrient is a positive direction: Set a negative value. When PressOrient is a negative direction: Set a positive value. The following graph is an example to set a negative direction by PressOrient. Force is applied while the robot presses on the probe plane. However, when the robot moves to the position of a hole, it will enter the non-contact state, so the absolute value of the force will become smaller.
| |
When ProbeDetectType is Obstacle: Threshold for the square root of the sum of the squares to the two directions which are not specified by PressOrient Set a positive value. The following graph is an example to set -Fz direction by PressOrient. When probing during motion in the Fx direction, a small force will be detected due to friction with the probe plane. If the robot makes contact with an obstacle, a large force will be detected.
| |
When detecting a hole: Normally, set to "0". | |
When the force will not be "0" even if the robot moves above the hole: Set a value which is small enough for the absolute value of the force during the probe motion. | |
When detecting an obstacle: Set a value which is large enough for the force during the probe motion and smaller than the force when contacting. |


Step 7. Set end conditions about position
Set properties (PosCheckEnabled, PosCheckType, PlaneNumber, PlaneEndCond, PlaneRelativeOrg, PlaneRelativeX, PlaneRelativeY, PlaneRelativeZ, PlaneRelativeOrient, PlaneAxes, PlaneRelativeRobotLocal) related to the end conditions of the positions.
Properties | Description, setting guide |
|---|---|
| PosCheckEnabled | This property sets whether to enable the end conditions of positions. You need to enable ForceCheckEnabled and/or PosCheckEnabled in the PressProbe object. This property may be used when ProbeDetectType is Hole. Normally, this property is not used when ProbeDetectType is Obstacle. As shown below, to detect a hole, you can make it an end condition that the robot moves to the hole direction by a certain distance from the probe plane.
True : When the end conditions related to position are enabled. |
| PosCheckType | Select types of the end conditions related to positions. |
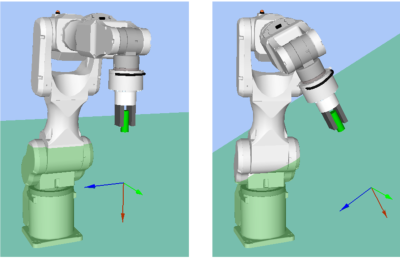
When selecting RobotPlane: End conditions are based on the set Plane. As shown below, use this property for setting the end conditions based on a defined position regardless of the position of the robot.
| |
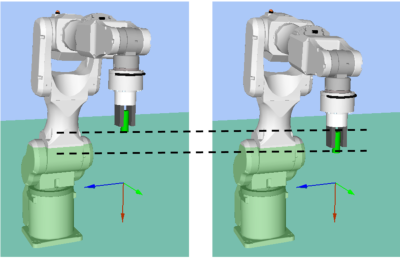
When selecting RelativePlane: Every time the force guide sequence is executed, create Plane at a relative position from the current position and set as an end condition of position. As shown below, use this property for changing the end condition positions depending on the position at the start.
| |
| In PressProbe, we recommend using RelativePlane. | |
| PlaneNumber | Set Plane number which is used for an end condition of positions. |
When PosCheckType is RobotPlane: End conditions based on the specified Plane number are set. | |
When PosCheckType is RelativePlane: Every time the force guide sequence is executed, reset the Plane to the specified number. Set an empty Plane number. | |
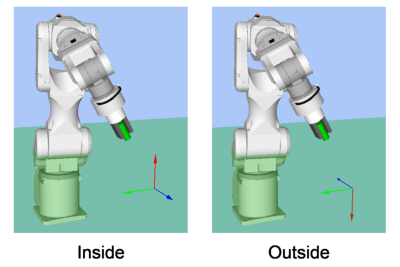
| PlaneEndCond | Set the state of the end condition of positions. Set either Inside (inside the Plane) or Outside (outside of the Plane) as an end condition. When the robot will be the specified state, it is determined as the end conditions of the positions are satisfied. Inside the plane: It is in +Z direction of Plane.
|
| PlaneRelativeOrg | Set which coordinate system direction is used as a reference when expressing the offset amount to the origin of Plane. |
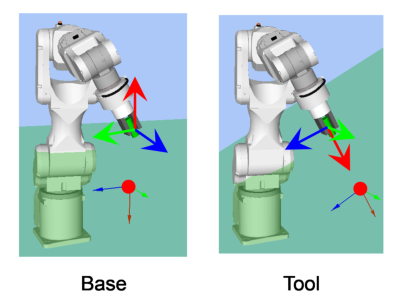
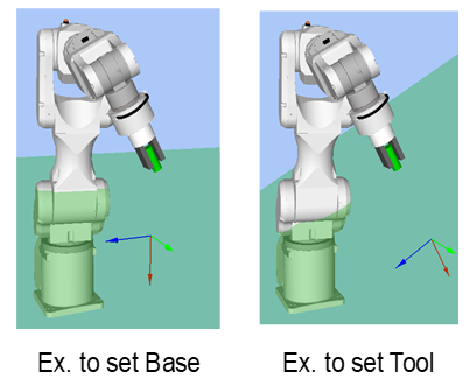
The left figure below is an example to set Base. Specify a relative distance based on the Base coordinate system. It is an example that the negative value is set in PlaneRelativeZ. The right figure below is an example to set Tool. Specify a relative distance based on the Tool coordinate system. It is an example that the positive value is set in PlaneRelativeZ.
| |
The Local or Tool coordinate systems are used only in that direction and origin position does not affect. To set the position of an end condition in the robot motion direction, normally set the same value as ForceOrient of the force guide sequence. | |
PlaneRelativeX PlaneRelativeY PlaneRelativeZ | Set offset amount in each direction from the current position to the origin of Plane. Direction will be the coordinate system direction specified by PlaneRelativeOrg. |
| PlaneRelativeOrient | Set a coordinate system based on the Plane direction. The left figure below is an example to set Base. Reference direction of the Plane matches the Base coordinate system regardless of the robot orientation at the start of the force guide object. The right figure below is an example to set Tool. Reference direction of the Plane changes along with the robot orientation at the start of the force guide object.
Since a plane which is perpendicular to the robot motion direction will set as the end condition, normally set the same value as ForceOrient of the force guide sequence. |
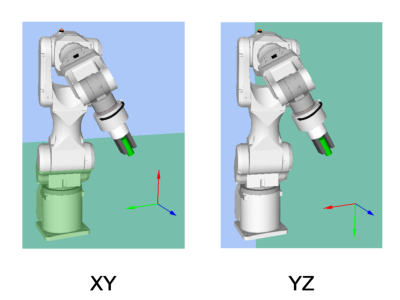
| PlaneAxes | Set a Plane direction Based on the coordinate system specified by PlaneRelativeOrient, plane is set to a direction set by PlaneAxes. The following figure is an example when Base is set by PlaneRelativeOrient. Left figure: XY is specified by PlaneAxes. Right figure: YZ is specified by PlaneAxes.
Normally, PressProbe sets a vertical plane to the direction specified by PressOrient. |
| PlaneRelativeRobotLocal | Set Local coordinate system number which is used when PlaneRelativeOrg and PlaneRelativeOrient are Local. Normally, set a value which is the same as RobotLocal of the force guide sequence. |