The [Mode]-[Live] button
Details of the displayed dialog box
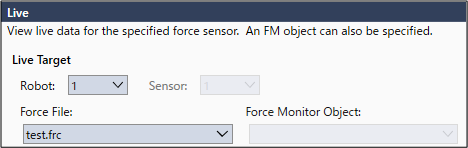
Select the [Mode]-[Live] button to display the following dialog box

Item | Description |
|---|---|
| Graph area | By starting "Live", the force information detected by Force Sensor and the position information of the robot are displayed on a graph in real-time. There are [Force], [1D Pos], [2D Pos], and [Pos Diff] tabs in graph area. You can switch them depending on the use. For details of each tab, refer to the following section. |
[Enable Trigger] checkbox check box | When placing a checkmark in the checkbox and starting "Live", start to display the data in the graph by satisfying the conditions set by trigger. |
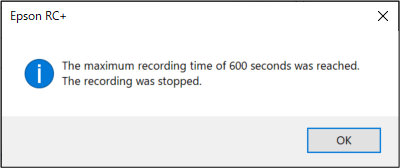
| [Start Live] button | Click the button to start "Live". After clicking the [Start Live] button, "Live" continues for 600 seconds at the maximum. Displayed button is changed to [Stop Live]. |
| [Stop Live] button | Click the button to stop "Live". Displayed button is changed to [Start Live]. |
| [Reset Sensor] button | Reset the Force Sensor. Values of force and torque will be "0". |
| Robot | Set a robot number that will be a target of "Live". When selecting a robot, Force Sensor that will be a target of "Live" is automatically selected. |
| Sensor | Set a number of Force Sensor that will be a target of "Live". Specifying the Force Sensor number displays the force information in Force Sensor r coordinate system. |
| Force File | Set the file in which the force monitor object is stored. When "None" is selected, the force information of Force Sensor coordinate system is displayed. |
| Force Monitor Object | Select from a list of objects (number: label) that are defined by files set in force file. When specifying the force monitor object, force information of the force coordinate system is displayed. |
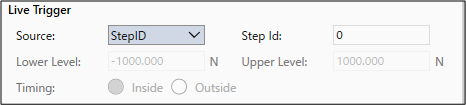
| Live Trigger | Set a trigger of start conditions when placing a checkmark in the [Enable Trigger] check box and starting "Live". |
Source : Select the object of the trigger. When you do not set a trigger, select "None". | |
| Step ID : Set StepID as a start condition. | |
| Lower Level : Set the lower threshold value of the trigger. | |
| Upper Level : Set the upper threshold value of the trigger. | |
Timing : Set the timing of the trigger. [Inside] : the value set above. When the value falls inside the range [Outside] : the value set above. When the value falls outside the range | |
| Recorded Live DataStart / End | Set a display range of Live data. Time : Set a start time or an end time. StepID: Set the StepID to start or end. |
| Save To File | Save the "Live" result data which is currently displayed in the graph to a file. When the [Save To File] button is clicked, [Save Data To File] dialog box of the log data is displayed. To save the data to a file, set the destination to save and a file name and click the [Save] button. |
"Live" Flow
Start "Live"
Before starting "Live," make sure to check that the contents of the Live setting are correct.
(robot number, sensor number, force file, and force monitor object)
Click the [Start Live] button and start "Live".
When "Live" is started, the data will be displayed in the graph and updated in real-time.

Stop "Live"
To stop "Live", click the [Stop Live] button.
It stops automatically when 600 seconds has passed after the [Start Live] button has been clicked.
When the [Stop Live] button is clicked, the data update will stop.

When 600 seconds has passed after the [Start Live] button has been clicked, the data update will automatically stop.

When 600 seconds has passed, the following message is displayed.
To restart "Live", click the [OK] button and click the [Start Live] button again.
"Live" flow when enabling the trigger function
Start "Live"
Place a checkmark in the [Enable Trigger] checkbox.
Before starting "Live", make sure to check the contents of Live setting or Live trigger are correct.
Make sure that the target trigger or trigger conditions are correct.
Click the [Start Live] button and start "Live".
Before the trigger conditions are satisfied: The data is not displayed in the graph. When the trigger conditions are satisfied, data will be displayed in the graph.
Before the trigger conditions are satisfied: The data is not displayed in the graph.

After the trigger conditions are satisfied: The data is displayed in the graph and keep updating in real-time.

Stop "Live"
To stop "Live", click the [Stop Live] button. It stops automatically when 600 seconds has passed after the [Start Live] button has been clicked.
(It is not 600 seconds after the data is started to be displayed.)
When the [Stop Live] button is clicked, the data update will stop.

When 600 seconds has passed after the [Start Live] button has been clicked, the data update will automatically stop.
