Device Setting - Hopper
This page allows you to check the optional hopper settings and run testing. When using the Gen2 hopper, you can also configure the hopper parameters.
Up to two hoppers can be connected to one feeder. The two hoppers can be adjusted independently.
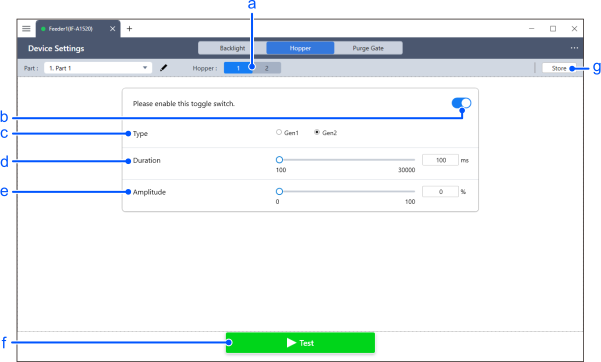
| Item | Description | |
|---|---|---|
| a | Selecting the Hopper | Select the hopper (1/2) you want to configure/adjust. |
| b | Hopper Connection Status | This setting determines whether or not the hopper is installed. Ensure the hopper is connected correctly before turning it on. |
| c | Type | Select the hopper type as [Gen.1] or [Gen.2].
|
| d | Duration | Set the hopper vibration time using a slider or text box. Setting range: 100 to 30000 [ms] |
| e | Amplitude | If you select [Gen.2] in [Hopper Type Selection], you can set the hopper amplitude using a slider or text box. Setting range: 0 to 100 [%] |
| f | Test | Used to run the hopper operation test. Pressing this button will activate the hopper selected according to the settings. After the test starts, the button will switch to the test stop button. |
| g | Store | During normal adjustment procedures, the adjusted parameters are not saved to the non-volatile memory within the feeder unit. Pressing the [Store] button will write the data to the device. |