Vibration - Adjust Mode
In adjustment mode, the focus is on adjusting vibration parameters. Immediately after startup, part ID=1 is selected. If part ID=1 is not set (initially, all parameters are 0), part ID=26 (default value) is copied.
Settings can be registered individually for each part. Part numbers can be selected from 01 to 26. Part 26 has a default value set and is read-only.
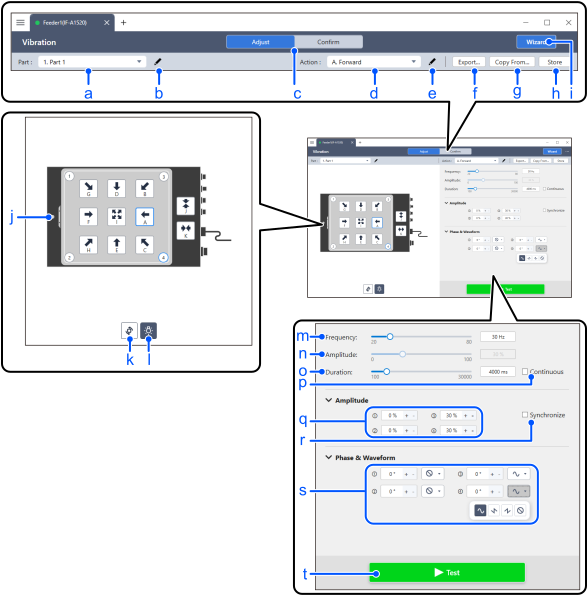
| Item | Description | |
|---|---|---|
| a | Selecting the part | Select the part number you want to adjust or check from the drop-down list. You can choose from IDs 01 to 26. Part 26 contains the default values and is read-only. |
| b | Editing parts name | You can name the parts. They can be associated with other parts used by the user. |
| c | Selecting [Adjust]/[Confirm] mode | Select a mode to adjust or confirm the vibration parameters. |
| d | Selecting movement action | Select the action you want to adjust or check from the dropdown list. Actions can be selected from A through Z. |
| e | Editing movement action name | You can name the selected action |
| f | Export... | Adjusted parameters and settings information will be output to an external file. |
| g | Copy From... | When adjusting parameters, copy and use the parameters from other part IDs. |
| h | Store | During normal adjustment procedures, the adjusted parameters are not saved to the non-volatile memory within the feeder unit. Pressing the [Store] button will write the data to the device. |
| i | Wizard | The vibration adjustment wizard will begin. Reference: Vibration - Wizard Mode |
| j | Screen display: Action buttons A to K | Pressing any of the action buttons A through K will execute the corresponding action. |
| k | Rotate display | Rotates the orientation of the displayed IF-A series illustration by 180 degrees. |
| l | Backlight test | Quickly checks that the backlight turns on and off. Even if the backlight setting is 0%, the lighting test will be performed at 50% brightness. |
| m | Frequency | Specify the vibration frequency for the selected action using the slider or by entering a numerical value. |
| n | Amplitude | Specify the vibration amplitude for the selected action using the slider or by entering a numerical value. |
| o | Duration | Specify the duration of the selected action using a slider or a numerical value. |
| p | Continuous | When you check the checkbox, the selected action will be executed continuously (for a maximum of 30 seconds), regardless of the value set for the duration. |
| q | Amplitude (Individual settings for each motor) | Enter the amplitude for motors 1 to 4 as a numerical value or click the [+] and [-] buttons to increase or decrease the value. Setting range: 0 to 100 [%] |
| r | Synchronize | Deselect this checkbox to individually adjust the amplitude, phase, and waveform of the four motors. |
| s | Phase & Waveform (Individual settings for each motor) |
|
| t | Test | The vibration of the specified action will begin according to the set parameters. After the test starts, the button will switch to the test stop button. |
KEY POINTS
The vibration, backlighting, hopper and purge gate parameters are saved as a single vibration set for each part. When importing or exporting parameters, all parameters are input and output at the same time.