Detailed Wizard Instructions
Select the [Adjust] mode on the vibration screen and press the [Wizard] button.
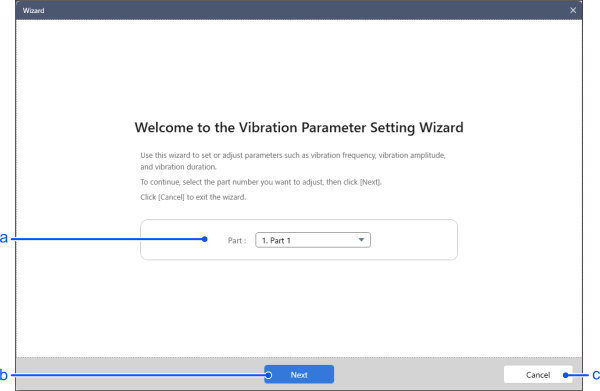
The wizard will start, and the Welcome screen will appear. Select the part ID you want to adjust.
| Item | Description | |
|---|---|---|
| a | Part ID Selection | Select the part ID you want to adjust from the dropdown list. |
| b | Next | Start wizard mode with the selected part ID. |
| c | Cancel | Cancel the wizard and close the screen. |
K: Adjust the frequency parameter for Short Axis Centering.
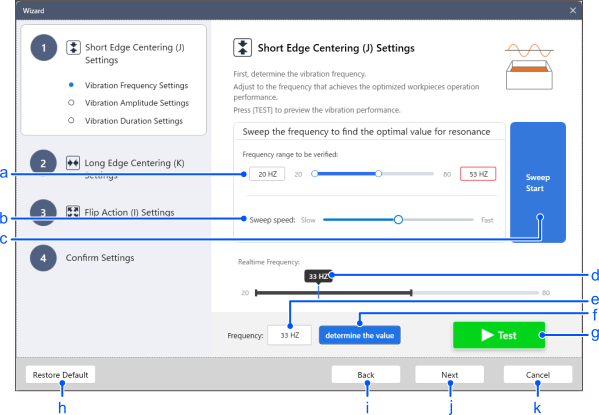
Specify the frequency range to adjust and the sweep speed, then sweep to find the appropriate frequency. Start with a wide range and gradually narrow the range to find the optimal frequency.
Frequency adjustment screen
| Item | Description | |
|---|---|---|
| a | Frequency range to be verified | Set the frequency range to adjust and confirm. Drag ○ or enter a numerical value directly into the text box to set the frequency range. It is not possible to reverse the high and low frequencies. |
| b | Sweep speed | The frequency is swept (changed smoothly and continuously) to search for the optimal frequency. A faster sweep speed allows you to check the setting range quickly, but it becomes more difficult to identify the optimal frequency. A slower sweep speed takes more time to check the setting range, but it becomes easier to identify the frequency. |
| c | Sweep Start / Stop | The sweep will begin with the set frequency range and sweep speed. After it starts, the button will switch to a stop button. When the stop button is pressed, the current frequency will be entered into the frequency text box. |
| d | Realtime Frequency | Displays the operating frequency. |
| e | Frequency | Enter the frequency you want to determine using this wizard. The default value is entered for the initial value. When you stop the sweep using the start/stop button, the frequency at the time of stopping will be entered. |
| f | Determine the value | Confirm the frequency entered in the frequency text box. After confirmation, press the test button to perform a test at that frequency. |
| g | Test | The vibration will be tested at the frequency entered in the frequency text box. You can check the frequency you selected with the sweep. |
| h | Restore Default | This resets the set frequency to its default value. |
| i | Back | Return to the previous step of the wizard. |
| j | Next | Proceed to the next step of the wizard. |
| k | Cancel | Cancel the wizard. All configured parameters will be discarded. |
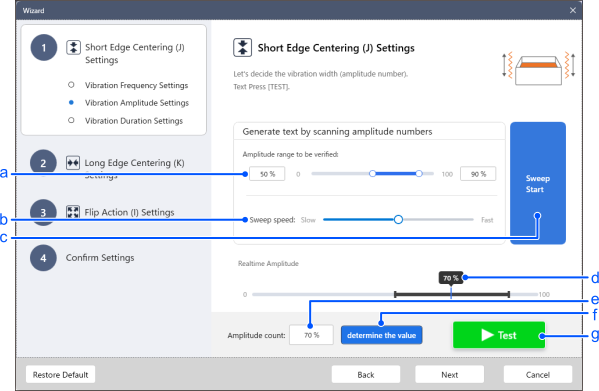
Adjust the amplitude parameter.
Amplitude adjustment screen
| Item | Description | |
|---|---|---|
| a | Amplitude range to be verified | Set the amplitude range to adjust and check. Drag ○ or enter a numerical value directly into the text box to set the amplitude range. It is not possible to reverse the amplitude. |
| b | Sweep speed | The amplitude is swept (changed smoothly and continuously) to search for the optimal amplitude. |
| c | Sweep Start / Stop | The sweep will start with the set amplitude range and sweep speed. After it starts, the button will switch to a stop button. When you press the stop button, the amplitude at that moment will be entered into the amplitude text box. |
| d | Realtime Amplitude | Displays the amplitude during operation. |
| e | Amplitude | Enter the amplitude to be determined by this wizard. The default value is entered for the initial value. When you stop the sweep using the start/stop buttons, the amplitude at the time of stopping will be entered. |
| f | Determine the value | Confirm the amplitude entered in the amplitude text box. After confirming, press the test button to perform a test with that amplitude. |
| g | Test | The vibration will be tested using the amplitude entered in the amplitude text box. You can check the amplitude determined by the sweep. |
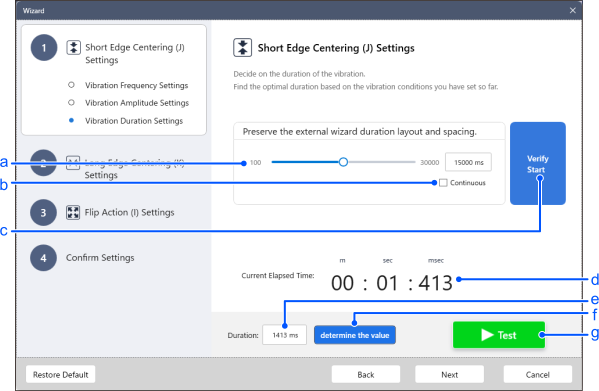
Adjust the duration parameter.
Duration adjustment screen
| Item | Description | |
|---|---|---|
| a | Setting the duration to be verified | Set the maximum duration for adjustment and confirmation. Drag ○ or enter a number directly into the text box to set the maximum duration. |
| b | Continuous | When the checkbox is checked, it will vibrate for up to 30 seconds, regardless of the set upper limit. |
| c | Verify Start / Stop | Vibration will begin. After it starts, the button will switch to a stop button. When you press the stop button, the current time will be entered into the duration text box. |
| d | Current Elapsed Time | This displays the elapsed time of the vibration. |
| e | Duration | Enter the duration to be determined by this wizard. The default value is pre-filled in the initial value field. When you stop the vibration using the start/stop buttons, the time at which it stopped will be entered. |
| f | Determine the value | Confirm the duration entered in the duration text box. After confirmation, press the test button to run the test with that duration. |
| g | Test | The vibration will be tested for the duration entered in the Duration text box. You can check the set duration. |
J: Adjust the Long Axis Centering parameters.
Adjust the parameters in the order of frequency, amplitude, and duration. The screen used is the same as for K: Short Axis Centering parameter adjustment.
I: Adjust the Flip parameters.
Adjust the parameters in the order of frequency, amplitude, and duration. The screen used is the same as for K: Short Axis Centering parameter adjustment.
The confirmation screen allows you to check the parameters you have adjusted so far.
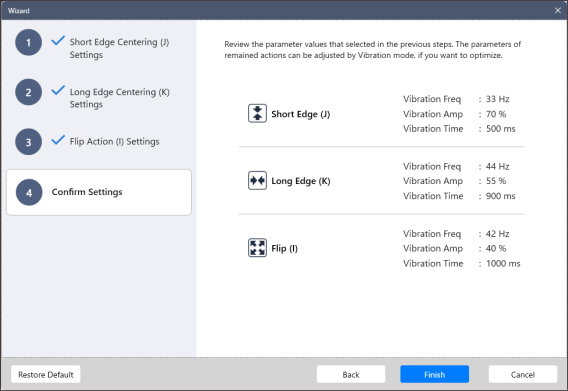
Press the [Finish] button.
Pressing the [Finish] button will write the configured parameters to the feeder unit.
← Wizard Flow Sequence →